Review: Anastasia Beverly Hills Contour Kit

I really want to love this palette, but I can’t.

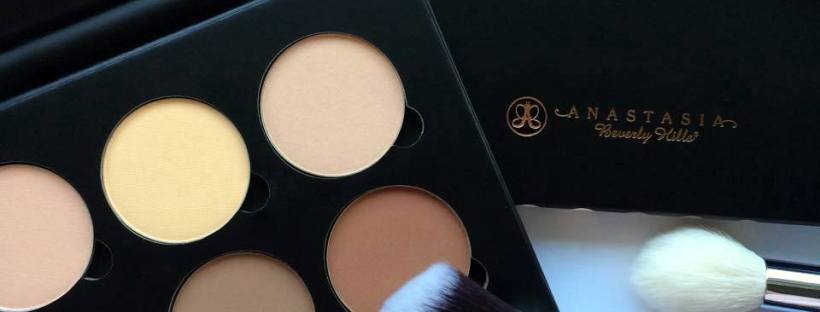
Anastasia Beverly Hills is the brand that turns girls into goddesses. First they fixed our eyebrows and now they fix our faces, sculpting cheekbones and jawlines since April 2014 when the long awaited Contour Kit went on sale.

It’s only in the last few months that I’ve truly realised the wonders of contouring and so, ever since, this palette has been at the top of my wish list. Last Thursday I received some particularly good news (more on this in a later post!) and decided to just bite the bullet.

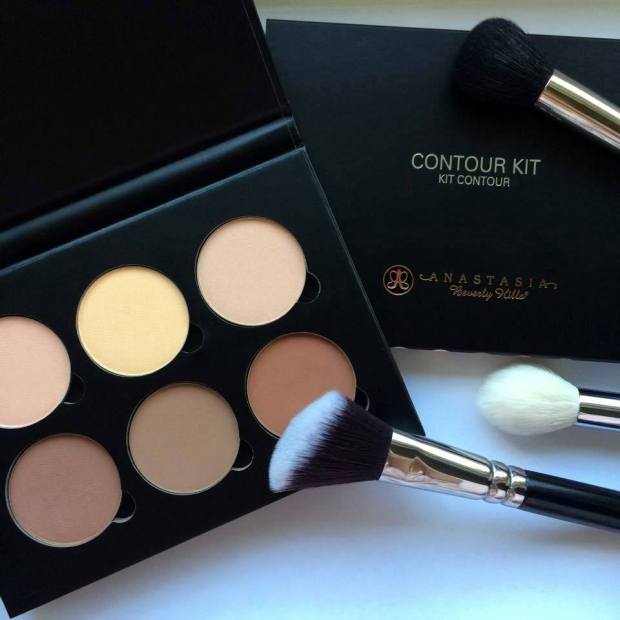
I’d seen pictures of the palette all over Instagram, but expected a little more than what I got. It looks, dare I say it… cheap *wince*

With the image ABH has as a glamourous, luxury brand, I think it would better suit an Illamasqua-esque packaging: an all-black, glossy case made of sturdy, chunky material with a mirror inside, maybe? Instead, the casing is made of a stiffened, matte black card, the type that will scuff and mark quite easily. Oh, and there’s no mirror 😦 I’d actually be happy to pay more than £40 for this kit if the packaging was just that bit more ‘fancy.’

11088254_10152696530011128_1867326654_n

But, even then, I still couldn’t use it.

Short of extending out a robotic arm and applying the powders for me, I expected them to deliver on every level. And, don’t get me wrong, there’s not a huge hype surrounding this kit for nothing; it seems that what money has been saved on the quality of the packaging has gone into the quality of the powders.

The term ‘buttery’ gets used a lot by beauty bloggers, but these powders really are lusciously smooth. You’d be forgiven for thinking they were cream-based; there’s no fall out and the pigmentation is amazing, even with the smallest dab of the brush. It’s another cliché, but a little really does go a verrrrrry long way. I’d imagine it would be a long time before you needed to buy a refill pan.

11086953_10152696548201128_256792745_n

For me, it will be a very very very long time – you could even say forever – as I won’t be using 4 of the 6 shades.

So now for the meaty bit: the colours.

I should have seen this coming. The palette is intended for ‘Light/Medium’ skin and though I fit into the former category, I certainly don’t fit the latter. I’ve seen a number of fair girls pull these shades off beautifully but, on reflection, perhaps they aren’t as pale as I am…
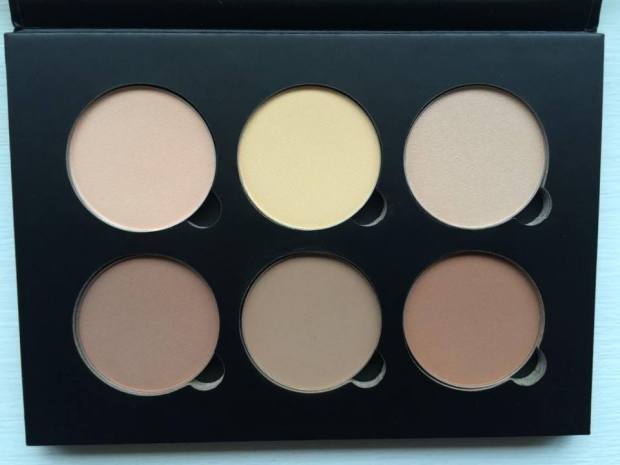
The Face Powders

11091167_10152696530006128_1864087248_n

As the two matte shades in the palette, I’ve assumed that Vanilla and Banana are the intended ‘face powders’ for setting and correcting. Vanilla, while a lovely colour in itself, should really be called ‘Light Peach.’ In the swatches below I’ve compared Vanilla to Bare Minerals’ Powder Foundation in ‘Fair’ and MAC’s Mineralise Powder in ‘Light,’ the difference is huge. There’s no way someone as pale as I am could use this as a powder; on Saturday, I actually used it in place of a blush!

11081453_10152696463956128_147367902_n

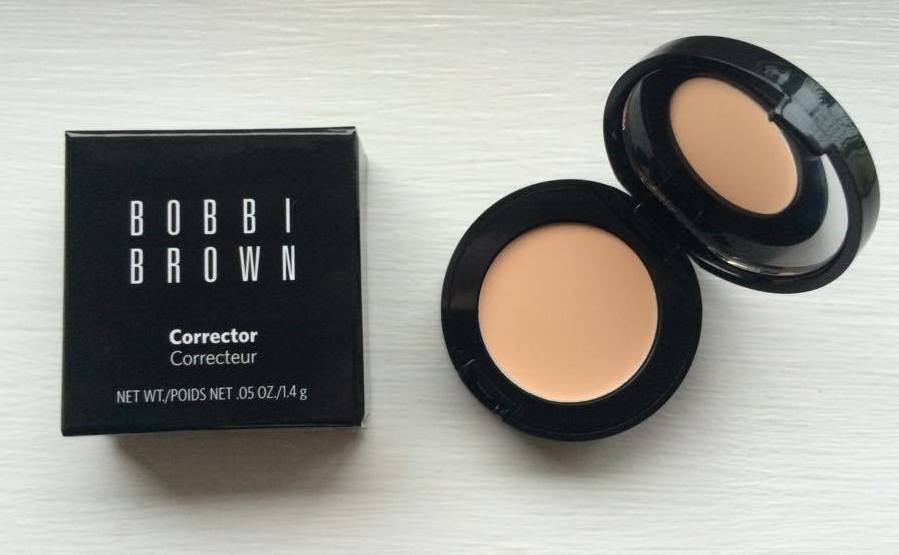
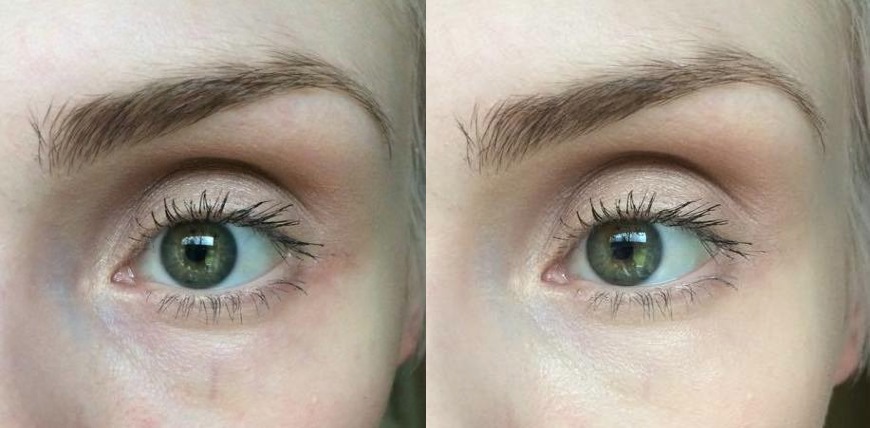
I knew when I ordered the palette that I would very rarely use Banana – if at all. If you like the sound of Ben Nye’s Banana Powder (which is quite hard to get hold of in the UK), this would make a great alternative. For me, however, the colour is just too strong to use alone. I tried it as a corrector and it works wonderfully, cancelling out the blueish hues of under eye circles. Just dab it over problem areas and then cover with your usual liquid concealer. But having just bought Bobbi Brown’s corrector (which comes in a paste form), I don’t think I’ll be swayed to choose Banana instead. Powder correctors can turn gummy when used under liquid concealers and, with all the primer in the world, it still manages to crease and cake.

The Highlighter

11091167_10152696530006128_1864087248_nThe last of the three light shades is Sand, a pale nude shimmer. This is by far my favourite colour in the palette; it’s delicate shimmer catches the light in just the right way, it’s in no way glittery but has an almost pearlescent finish. In the photo below, I’ve compared Sand to my current go-to highlighters.

As you can see, the colour is very similar to Illamasqua’s Helios from the extremely popular Sculpting Duo. 

Much like Vanilla, Sand is most definitely a peachy nude, however, the satin finish means even pale girls like me can get away with it, especially when it’s layered over blusher. Ideally, though, Sand would look something more like MAC’s Lightscapade, a more universal champagne shade that suits both cool and warm undertones.

11117804_10152696560741128_1989199120_n

The Contour Powders:

11081443_10152696529991128_653013877_n  (L-R: Java, Fawn, Havana) Again, I knew when I ordered the kit that I would find little use for Java and Havana, as both are particularly warm browns. But, I thought, with Fawn – a cool earthy shade – to rely on, I could use them to add a touch of warmth when the sun was out and when (if) I caught a tan this summer.

Of course, this depended on me liking Fawn. But I don’t. In the palette, sandwiched in between two russet shades, Fawn looks the perfect grey-brown. On my face, though, it’s still just that bit too orange-y.

11088253_10152696463796128_1131556952_n

In the photo above, I’ve compared the three colours to other contouring products I own. My go-to shades are Illamasqua’s Cream Pigment in Hollow and NYX’s Blush in Taupe, both of which have a much cooler hue when compared to Fawn. Fawn is a lot like Benefit’s Hoola with the volume turned up. 

I have to be careful to add only a modest amount of Hoola before I tip into Tango territory, so Fawn is all the more risky for me. But layered with a touch of blush, Fawn makes for a lovely plum coloured blush/bronzer that’s perfect for a night out, but for a Spring day, it is just that bit too heavy for my taste.

Overall, I’d give this palette a 6 out of 10. The only saving grace being the quality of the powders; as you can see from my swatches, their pigmentation and opacity rivals cream pigments! But, while the colours aren’t unusuable, they do need to be mixed with other products in order to suit my skin tone.

ABH has since promised a ‘Fair/Light’ kit, which will hopefully include all those shades necessary for sculpting a pale face: white, silver, champagne and taupe.

Either that, or I’ll have to get a spray tan..

Hope you like!

Molly x

My First Lush Purchases

I’m so late to the party with this one, but now I’m here, I’m staying ’til the lights come on.

There’s a reasonable excuse for my tardiness, though; when I was younger I bought a selection of bath fizzes on holiday and after using only one of them I came out in a horribly itchy rash from my neck to my toes. Ever since I’ve avoided anything strongly perfumed like the plague and, because you can smell a Lush store from 100 metres away, that meant all things Lush.

Having bought a Lush lip scrub a few months ago (it was vigorously recommended to me by a friend) and having not come out in hives, I wondered back in my local store to have a nose around and came away with these three pots of loveliness.

Big Salt Shampoo, £12.25

I have fine hair and a lot of it so I am constantly adding all sorts of products to give it a bit of life: hairspray, wax sprays, gels, gums, leave-in conditioners, mousses, toners, dry shampoos, serums – you name it and it’s probably in my hair. As such, it doesn’t seem to stay fresh for more than a day without looking and feeling heavy and greasy. Lush’s Big Salt Shampoo is the answer; its unique formula is designed to remove this gunk by exfoliating your hair and scalp, leaving both wonderfully smooth and refreshed (and smelling of fresh laundry!).

The name is literal: huge chunks of sea salt are suspended in a lusciously thick shampoo. The salt acts as an exfoliator, scrubbing away dirt from the scalp and hair strands, and a volume booster (along with the help of  extra virgin olive oil and seaweed, both rich in protein) by slightly drying the hair, much like a sea salt spray does. With reduced moisture, the hair is not so ‘slippy’ and less like to slide out of shape and style, meaning it’s easy to achieve that beachy, tousled look that’s ideal for Spring.

11096702_10152689733821128_713802206_n

Of course, if used too regularly, the salt will begin to dry your hair too much; I only use it once a week at the most. Another reason I have to use this sparingly (*sad face*) is because it contains lemon and lime juice, both natural bleaching agents. While these help make your hair look ultra-shiny, they are the nemesis of toners and hair colourants. As with any shampoo, toners and hair colours will fade, but the added ingredients in this pot of magic will accelerate this.

Overall, then, I’d definitely recommend this product for those of you who, like me, choke in a cloud of hairspray each morning and, by the end of the week, feel like their head is clogged full of product. I’ve never before used a shampoo that has been so effective at removing all those nasty gunky bits in such a natural, gentle way.

Rub, Rub, Rub, £8.75

So if Big Salt is an exfoliator for your head, this is for your bod. Again, the secret with this is sea-salt. Having sensitive skin, I was a little nervous that the formula would bring me out in spots, but the fine grains of salt offer gentle exfoliation as well as antiseptic properties that helps remove dead skin without causing agitation.

The mixture lathers only slightly when mixed with water meaning it doesn’t lose any of it’s impact and leaves skin feeling super soft, fresh and hydrated. A body scrub that also moisturises is quite difficult to come by in my experience; as you can see in the picture below, the scrub is quite loose and seems to leave behind an oily residue on the skin.

11084557_10152689730421128_223128685_n

For a Lush product, I personally find the smell rather so-so. Made with mimosa blossoms, the scrub has a very verrrrry ‘clean’ smell, which is nice, but not particularly girly or sweet smelling for my taste. That being said, it’s not an awful smell and always makes the product suitable for guys too (don’t say I never think of you gentlemen ;)).

The only warning I offer is to be careful using this after shaving. Yes, I know you should exfoliate and then shave, but sometimes I forget… The citrus juice and salt in this mixture will soon let you know if you’ve nicked your leg…

Helping Hands, £7.75

I can’t stand when my hands are dry; when it feels like any sudden movements will result in split skin and flecks of blood. As I’m usually covered in make-up, I repeatedly wash them with soap and water, which does nothing for my skin. Lush’s Helping Hands hand cream is perfect for restoring all this lost moisture and making my skin feel supple again.

This cream particularly targets sore hands: honey, lavender and marigold bring relief to sore and chapped skin; chamomile reduces redness and linseed softens skin to limit splitting and flaking. All Lush moisturisers rely on an amazing cocktail of natural emollients. Helping Hands is packed full of almond oil, cocoa butter and shea butter to create a thick lotion that takes only seconds to soak in, leaving no greasy residue only wonderfully soft skin.

Again, the smell is divisive. The most prominent smells are that of the butters which both have a peculiar nutty, almost smoky, smell, but it is by no means overpowering and seems to disappear as soon as the lotion sinks into the skin.

So there are my first Lush purchases and they won’t be my last! Though they’re not cheap, the quality of the products are unbelievable and knowing that every ingredient has been selected from a natural source with individual thought as to it’s purpose and effect makes every single penny worth it.

What are your favourite Lush products? What would you recommend I try next?

Hope you like!

Molly x

My Custom MAC Eyeshadow Palette: Part 1

I was a few steps away from the checkout, MAC’s Warm Neutrals Palette in hand, when I thought… I actually won’t use around half of these colours. It doesn’t include any of the shadows I’ve been lusting after for a while now and, in my opinion, there are a few too many yellow-y honey shades and no “curve-ball” colours that would really mix up my every day looks. For £65, it’s a pretty steep investment in something I wouldn’t use all that much. 

So I put it back and decided to build my own custom pro palette.

11072574_10152673001311128_530462597_n

MAC eyeshadows aren’t cheap by any means (individual pans cost £10) so building your own 12 piece palette will cost just under double the price of the pre-made ones. But if being able to pick out your own shades means that you’re more likely to use them at every opportunity, the extra expense is surely worth it. 

The range of colours and finishes offered by MAC is quite overwhelming when you’re trying to choose just twelve. Whenever I visit my local store, I go into a heady daze where everything and anything is beautiful, wonderful… and affordable (eesh), which doesn’t make for easy decision making. 

But I’m going to (try and) be sensible. I’ve decided to choose 4 matte transition shades, 4 warm neutrals (frosts/shimmers) and 4 more unique, out-there colours to mix up my go-to looks. Here are my first 6 beauties:

 Mattes:

11084430_10152673001286128_1269759344_n

L-R: Wedge, Quarry, Handwritten

Wedge: This is one of MAC’s most popular transition shades, a lovely warm beige. Given that I’m a sucker for warm colours, I was surprised to find that I don’t actually own a matte in this colour, so it was an obvious choice to help blend other shadows. Its neutral hue and matte finish provide a “no make-up, make-up” look which is perfect for Spring and helps to add definition to the eye with subtle depth. 

Quarry: A lesser known shade, Quarry is a unique grey-beige matte with a cool mauve undertone. In comparison to Wedge, Quarry is great for blending out cooler shades of grey, pastels and silver. Again, a great staple for lighter Spring-time looks when you want to tone down that dark smoked out eye.  

 11081649_10152673001251128_1376393010_n 
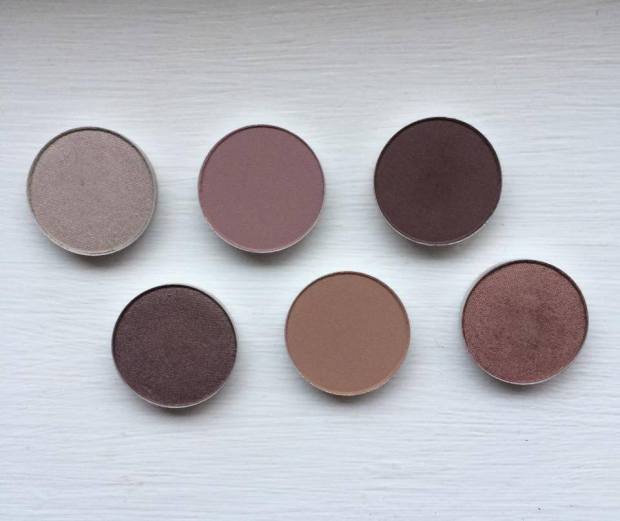
Handwritten: Okay, so I know I’ve just said that I’d look to tone down a smoky eye for Spring, but there are some days when nothing else will do. If in doubt, smoke it out, right?! 

Black smokes can look a little heavy on my face, particularly if my eyes are tired and a little puffy, so I usually rely on chocolate browns or deep burgundies as my go-to smoke shades. Handwritten is ideal for this, either placed across the lid or blended into the crease. 

Warm Neutrals:

11056723_10152673001241128_432067580_n

L-R: Satin Taupe, Sable

Satin Taupe: My first “proper” eyeshadow was Bare Minerals’ Loose Shadow in the colour ‘Celestine,’ a beautiful mid-tone taupe with a gold shimmer. I must have worn it almost every single day whilst I was at university, no matter what the occasion. Since leaving (and having an income!), my makeup collection has grown and Celestine has gotten lost – or ‘over-shadowed’ (BADDUM…) – by my other palettes. When I swatched Satin Taupe, it instantly reminded me of Celestine (if not as shimmery) and I knew I had to have it. 

Maybe it’s just me, but I often work on creating multi-tonal smokes in my crease and underneath my eyes, but can sometimes be left stumped as to what to use on my lid. I need a neutral colour with enough oomph to stand up to dark smokes and enough interest to work well be itself. Satin Taupe is the answer!   

11081663_10152672999761128_1406915266_n Sable: This was the first shadow I was drawn to when scanning the shelves at MAC. Sable is a warm, earth coloured red – the marsala shade – with a delicate gold shimmer that is not at all ‘glittery,’ but rather has a gorgeous pearlescent finish. I tend to use this in a similar way to Handwritten to mix up my usual smoky eye looks. Though classed as a ‘shimmer,’ Sable’s shine is subtle enough to be smoked out in the crease without causing your eyes to glimmer like beacons – an absolutely beautiful shade perfect for switching up classic looks for those summer-time date nights!


Curve-balls:

11046895_10152672999771128_1908136478_n 

Vex: This is a strange colour, but strange in a really really good way. It doesn’t look much of a “curve-ball,” but it’s duo-chrome finish is so difficult to capture on camera. While it looks like an ordinary silver grey shadow in some lights, in others it shines like a pearl with pink, purple and green hues. The best way to draw out the multi-dimensional colour of this shadow is to foil it with MAC’s Fix+ or another mixing medium. I’ll definitely be making the most of this shade this Spring as it makes for a gorgeous compliment to pastels and smokes alike, it’s great for adding a quirky edge to simple looks.

MACVex  So, that’s half of my collection already sorted! Ideas for my next 6 shades include ‘Cranberry,’ ‘Pink Freeze,’ ‘Mythology,’ ‘Plum Dressing,’ ‘Crystal’ and ‘Trap’ with possible curve-balls being ‘Plumage,’ ‘Sumptuous Olive,’ ‘Jest’ and ‘Lucky Green.’ 

What are your favourite MAC shades? Would you consider making your own custom palette?

Hope you like! 

Molly x

Essentials: Bobbi Brown’s Corrector

I’m tired. Okay, I’m exhausted. But I don’t want people to know it.

And it happens every time: an hour after applying my makeup, they start to creep back to the surface, those dark under eye circles. These aren’t just ‘bags,’ they’re suitcases and they refuse to go away.

Despite a cocktail of concealers, my attempts to mask them are all in vain. By 3pm my eyes look dark and drawn. So how do those other people do it? How do they look as fresh at 8pm as they did at 8am? The answer: correctors.

Colour correctors can be applied underneath concealers in a paste form, or over the top of concealers in powder form, and are produced in a variety of shades according to their purpose (and their place on the colour wheel):

Green counters red –for taming angry spots and broken veins;

Yellow counters purple –for masking particularly dark circles, scarring and bruising;

Orange counters blue – for hiding under eye circles;

I chose Bobbie Brown’s Corrector (£19.00) because of its amazing texture; correctors are, by their nature, a lot thicker and tackier than concealers, but this is thick while easy to blend, gooey but not greasy. In my opinion, Bobbi Brown also has the widest variety of shades available. I had looked into buying MAC’s Conceal and Correct duo but found the colour choices quite limited. Yes, I want enough orange to hide my dark circles, but I don’t want to look like I’ve had a fight with a can of St Tropez.

The lightest shade of corrector available in the Bobbi Brown range is called ‘Porcelian Bisque,’ an almost magnolia colour with the slightest hint of warmth. I assumed that this would be the ideal shade for me, but when swatching it in-store I found it too light (!shock horror!). This would be a great choice for those wanting to try a tame corrector for the first time, or those lucky enough to have only the faintest dark circles. I, on the other hand, want a Photoshop worthy corrector, so I picked ‘Porcelian Peach.’

11020337_10152672991041128_404125399_n

As the name suggests, this shade is still among the lightest offered by the brand, but it has a considerable orange hue. In the swatch above I’ve compared it to my typical concealer shade, NARS Radiant Creamy Concealer in Chantilly (on the left). Bobbi Brown’s offering is the brightest of the two by far and has a salmon-esque colour as opposed to NARS’ typically yellow-toned bases. The corrector immediately lifts and brightens the skin, while it’s texture (I hope you can tell from this swatch just how thick and luscious it is) acts as both a wonderfully smooth primer and a glue to hold down your concealer.

I have to admit, I was a little nervous at first; being so pale, I’m particularly paranoid about my colour choices and, though I’ve had a number of concealer faux pas, I’ve never applied something so peachy intentionally. But, it works! In the pictures below, I applied my base as I usually would on the left and have added the corrector on the right. The difference is huge, and wonderful!

The true test of a corrector is its staying power. When your concealer begins to break down and fade after 5-6 hours (even when using the premium brands), a corrector will stay in place at full coverage for around 8-9 hours, meaning your face looks as fresh and dark circle-free as it did when it was first applied.

Of course, it’s not a miracle worker and there are some things to be careful of. This is by no means a light formula and adding another paste to your makeup routine does increase the risk of caking and creasing. The former can be easily avoided as long as you aren’t heavy-handed and blend the corrector in well – a  little goes a very long way (this one in particular won’t lose its intensity once blended).

As for creasing, I’ve found that applying a good amount of primer beforehand and a fair dab of powder afterwards helps to stop this from happening for the majority of the day. When I begin to notice lines appearing, it simply work the products back into my skin using my finger, reapply some powder, and I’m ready to go for the next few hours: a small price to pay for a dark circle eraser!

So, would you consider Bobbi Brown’s corrector?

Do you use correctors as part of your getting ready routine?

Hope you like!

Molly x

Essentials: Illamasqua’s Hydra Veil

There’s a lot of hype, and an equal amount of confusion, surrounding Illamasqua’s Hydra Veil. What is it? What does it do? Why does it look like that?! Well as someone who battles with flaky, dry skin, anything with ‘hydra’ in its name is an instant hit with me. Saying that, at £30, this product isn’t cheap and with its exact purpose somewhat ‘veiled’ in mystery (BADDUM-TSCH), it’s been one of those items that I’ve been lusting after, but not quite had the guts to buy.

Then payday came around and I got a little spendy.

I understand that there is a thread throughout my posts on the theme of “I bought this thinking it was [blah] when it turned out to be [significantly different blah].” Please trust that I really, really, do do my research on products before I buy them, but Hydra Veil seemed to evade any form of definition. What is a primer? What is a moisturiser? Neither or both?

So I bought it thinking it was the former; my foundation, particularly Illamasqua’s own Skin Base, has been settling into my fine lines a little too quickly of late, so I thought I’d invest in a good primer.

Illamasqua’s Hydra Veil is not a primer.

Well, not technically. Neither is it a “skin care” product as it doesn’t offer any long-term benefits to the skin – it won’t prevent those crow’s feet from forming and it won’t treat blemishes. But that doesn’t mean that it’s not absolutely AMAZING.

Illamasqua describes this as a “cosmetic care” product…

What I imagine they’re trying to get at is that Hydra Veil is geared towards enhancing the appearance of your makeup (your ‘cosmetics’), rather than treating or repairing your skin. With this instant hit of hydration, your skin becomes the perfect canvas.

In a typical Illamasqua-esque tub, all black, sleek and simple, there is a pool of clear jelly and a tiny little spoon. Cute, but a weird start to my getting-ready routine. It’s like no other beauty product I’ve tried before: just scoop out a pea sized amount and smother it all over your face. The veil has the texture of a semi-set jelly which barely holds its shape, so as soon as you apply a small amount of pressure it completely breaks down to a water-like consistency, making it easy to spread across the skin. If you apply the correct amount (more on this later), the product melts away in seconds to create that velvet soft, ultra smooth feeling that you would usually achieve with primers.

This is probably where all the confusion comes from as Hydra Veil does leave the skin feeling ‘primed’ for makeup. However, primers work by effectively placing a ‘lid’ over the top of pores and filling in fine lines. Any makeup applied afterwards therefore sits on top of this primer rather than falling into these crevices. This ‘lid’ also reduces the amount of oils secreted from the pores meaning that you’re less likely to develop shiny patches throughout the day.

Ilamasqua’s Hydra Veil, on the other hand, does not create such a ‘lid’ and it doesn’t fill in fine lines; this super smooth feeling is caused by the veil providing the skin with a huge, instantaneous hit of hydration which swells skin cells to leave that healthy, plumped feeling – an ideal base for makeup. Because of this, there’s no guarantee that your makeup will stay put for longer. It will, however, help to prolong that freshly-applied look by creating a delicately dewy glow.

Why not just splash your face with water? Water evaporates too quickly, particularly from a warm surface like skin, and can actually draw more moisture out than that it allows in.  Hydra Veil contains Glycerin (which I spoke about here), a product often found in mixing medium as it evaporates at a much slower rate than water. This means that products stay ‘wet’ for longer = the secret to that extended fresh-faced look.

I have noticed a huge difference when applying my foundation after Hydra Veil; my base seems to glide on effortlessly, no uneven patches, no difficulty blending, no caking or scuffing across dry skin. In particular, Hydra Veil works brilliantly in conjunction with Illamasqua’s SkinBase, the formula of which is given to highlighting every lump and bump. I haven’t noticed as big a difference in the longevity of my makeup, only that it looks ‘fresher’ for longer – which is obviously a massive bonus! Applying a spot of primer underneath my eyes and around my nose after the veil soon sorts this issue for a smile/frown/squint-proof base. It is especially good at waking up tired, puffy eyes, so massage some onto your lids to open up your peepers. (Illamasqua also recommends this as a post-shave balm (for guys, of course) to help soothe broken skin with a moisture punch)

The strengths of Illamasqua’s Hydra Veil are also its weaknesses; while it’s innovative formula works wonders, it can take a little getting used to. A very little goes a very long way; too much will only sit on the surface of the skin and have to be dabbed away = wastage and for an expensive product, wastage is a big no-no. It is worth experimenting with this product to see what is best for you: how much do you need; what areas of your face take to it best; what primers/foundations work best with it; they’re all questions raised by its weirdly wonderful design, and though it may take a few attempts, it will definitely be worth it in the end!

Would you consider Illamsqua’s Hydra Veil?

Hope you like!

Molly x