
The sun is coming out, summer’s on its way and, yes, I could just sit outside slathered in oil with a sheet of tin foil, but why sweat when I can just fake a tan? This tutorial will show you, especially you pale folk, how to fake it without the risk of streaks or that lingering smell of biscuits.

Contour
So, of course, the most important part of this look is your base with the secret being – as always – contouring. Whatever you do, do not try and fake it by using a darker shade of foundation/concealer! Contouring will only add colour to those areas of your face that would usually catch the sun, making for a more natural looking ‘tan.’
My preference for this look is a powder contouring product; cream-based pigments and concealers can look a little heavy on the skin and the look we’re aiming for is something fresh and ultra-natural. Powders are also much easier to work with in terms of building up colour and blending thoroughly. My go-to powder contour will forever be NYX’s Blush in Taupe, a perfect cool-toned brown. But, alas, a tan will never be cool-toned, so my mission began – find a warm contouring product for the palest of the pale.

And here it is, MAC’s Powder Blush in Harmony, my most favourite product for this Spring/Summer. The colour is particularly difficult to describe as it lies somewhere between warm and cool tones. MAC describe it as a “muted rose-beige brown,” which kind of sounds like they couldn’t decide how to label it either, but I guess they’re not far wrong. The key with Harmony is that it doesn’t have that bronzer-type orange/terracotta look, instead it’s ‘rose-beige’ hue mimics the colour that pale skin would conventionally turn in the sun (providing it’s slathered in factor 30).
I begin by first applying my usual concoction of foundation: MAC’s Studio Fix Fluid in NW10 and Illamasqua’s Skinbase in 02. On the left below I have indicated the areas that I would usually contour using MAC’s Harmony and on the right, those areas I would contour with my conventional cool-toned contour, i.e. NYX’s Taupe blush.

Add the two together and viola – sunkissed skin! As you can see, I bring my warm contour a little wider and higher than my cool contour, straying into the areas of my face I would usually highlight. Just as highlighter is used on the high points of the face, so too should this warm contour as these areas (cheekbones, nose, chin and forehead) are always the first to tan.
I choose to apply MAC’s Harmony first using my Zoeva Cream Contour Brush (though intended for cream based products, the angled edge of this brush makes it ideal for hugging the natural curvature of my face), being careful to diffuse it as much as possible – the wonderful feather-light formula makes this very easy! Blending a small amount of product around and underneath your jaw line will help prevent your neck looking a completely different colour to your face and I also like to add some across my collarbones to continue the illusion that I’m lusciously bronzed all over (remember to do this if you’re wearing a low cut top).

I then use my MAC 186 Small Contouring Brush (it’s small, dense tip is great for focused and defined contouring) to apply NYX’s Taupe into the hollows of my cheeks using tight circular motions in an upwards direction. I’ve added a comparison photo of the cool and warm contour to give you an idea of how warm Harmony is (please excuse the state of my NYX’s blush, it’s particularly loved!).
Then for my nose, I use my Sigma Detail Brush to draw two lines about a centimeter apart down the edges of my nose with Urban Decay’s ‘Tease’ eyeshadow from the Naked 2 palette (NYX’s Taupe works equally well, but the buttery eyeshadow is particularly easy to blend). Having blended this in with my fingers, I use any excess product left on the 186 brush to continue blending and deepen the colour.
Highlight
MAC’s Lightscapade holds a special place in my heart as a 10/10 highlighter, but I think this look requires something a little warmer than its pale champagne colour. My favoured highlighter for this Spring/Summer is Illamasqua’s Lumos from the Sculpting Duo; it’s peachy gol d tone with super-fine shimmer adds the perfect natural ‘glow’ to the skin that, together with MAC’s Harmony, makes for the ultimate ‘sun goddess’ pairing.
I apply this is all of the conventional areas (overlapping some of my warm contour), particularly focusing on the bridge of nose and the highpoints of my cheekbones using my Zoeva Luxe Highlighter Brush. Beware that Lumos is a particularly fine powder so you may need a few coats to get the glimmer you desire (it also has quite a lot of fall out, so don’t apply it whilst wearing your best white dress…I speak from experience).
Blush
I don’t feel that this look really needs a blusher as there is already plenty of warmth in the contour; all the same I opted for an  equally bronzed, glowy looking colour just to finish the face (I guess you could use a pink or plum, but I think the ‘flushed’ cheek is more girl-next-door than beach babe).
MAC’s Cream Colour Base in Shell makes the ideal blush for this sun-kissed look; just as Harmony brings together just the right amount of pink and beige, so does Shell have the perfect blend, a iridescent rose gold. With its gorgeous glossy finish, this cream colour adds that “fresh-from-the-sea” glow to balance the matte contour. I apply it with my fingers to the apples of the cheeks, sweeping it back and upwards to join my highlight, sitting just above my contour. This product also makes for a striking yet simple eyeshadow, just dab over the lid for a super chic take on the glossy eyes trend.
Eyes + Lips
For the look that I originally posted on Instagram, I chose a cool brown/taupe palette for my eyes and lips, using MAC’s Satin Taupe eyeshadow and LA Splash Cosmetics’ matte liquid lipstick in Ghoulish. I find that warm, deep colours can sometimes make me appear paler than usual as my skin doesn’t have the same depth of colour. So here I worked on the opposite principle: these neutral cool tones help to accentuate what warmth there is in my skin and so help me to appear more ‘tanned.’

That being said, my favourite lipsticks to add to this base are at the other end of the ‘subtle’ spectrum. MAC’s Costa Chic or Jeffree Star’s 714 are both neon coral, a shade notable for making tans look ahhhhh-mazing. The sheer brightness of these lippies can’t help but to emphasis the warmth of your contour making even the palest of the pale appear lusciously golden (I used Costa Chic in the picture on the right above). I’ll be writing another blog post specifically on coral lipsticks so stay tuned!
Will you be ‘faking’ it this summer?
Hope you like!
Molly x

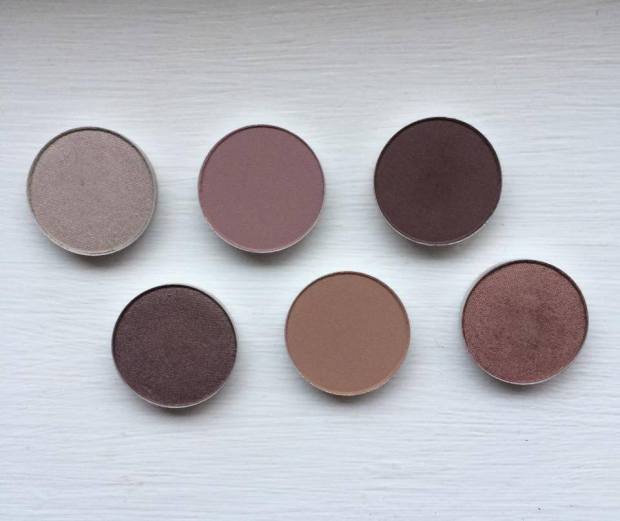

 Handwritten: Okay, so I know I’ve just said that I’d look to tone down a smoky eye for Spring, but there are some days when nothing else will do. If in doubt, smoke it out, right?!
 Sable: This was the first shadow I was drawn to when scanning the shelves at MAC. Sable is a warm, earth coloured red – the marsala shade – with a delicate gold shimmer that is not at all ‘glittery,’ but rather has a gorgeous pearlescent finish. I tend to use this in a similar way to Handwritten to mix up my usual smoky eye looks. Though classed as a ‘shimmer,’ Sable’s shine is subtle enough to be smoked out in the crease without causing your eyes to glimmer like beacons – an absolutely beautiful shade perfect for switching up classic looks for those summer-time date nights!
 So, that’s half of my collection already sorted! Ideas for my next 6 shades include ‘Cranberry,’ ‘Pink Freeze,’ ‘Mythology,’ ‘Plum Dressing,’ ‘Crystal’ and ‘Trap’ with possible curve-balls being ‘Plumage,’ ‘Sumptuous Olive,’ ‘Jest’ and ‘Lucky Green.’