How to Make the Most of Pure Pigments

It’s the perfect time of year for adding a touch of sparkle to your make-up routine and pigments are by far the best way to do so. With Christmas parties and New Years Eve in mind, I recently bought both Beguile – described as “light shimmer” (?) but actually an iridescent white – and Furore – “champagne peach shimmer” – by Illamasqua.

Having swatched them under bright lights in store, the colour and sparkle was self-evident, I had to buy them! But when I applied them to my lids the next day, I was a little underwhelmed by the pay off. So here is a quick guide on how to make the most of your pigments.

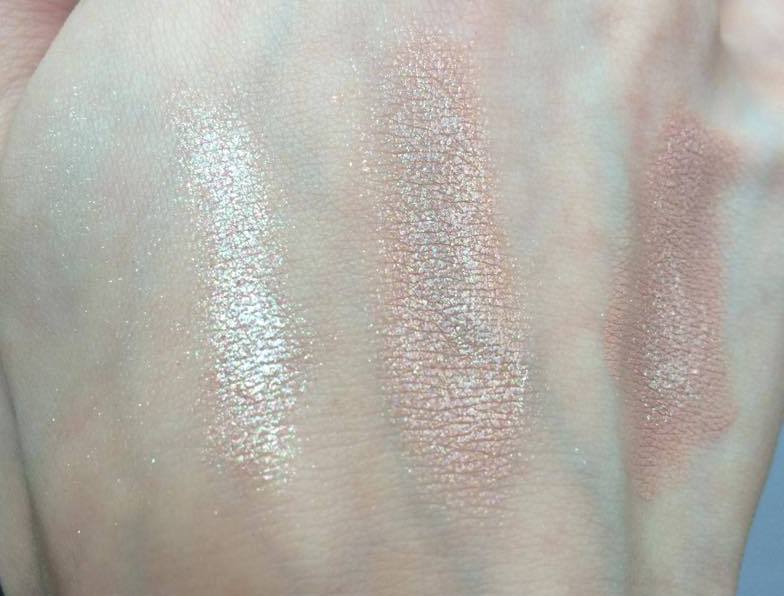
Of course, you could just simply apply the powder to your bare skin for a simple, stripped back look, but the party season demands something a little more dramatic. The strength of your pigment depends on the base they are applied to; below I swatched the pigment alone; with Illamasqua’s Sealing Gel; with Illamasqua’s Vintage Metallix in Courtier; and with MAC’s PaintPot in Painterly.

Beguile

Beguile

Furore

Furore

As you can tell from these pictures, the difference is striking. On my pale skin, both pigments, particularly Beguile, are barely visible when used alone and only add a slight shimmer (which could work well as a subtle highlighter, though Beguile is a little less ‘natural’ due to its iridescent pink and green tones).

MAC’s PaintPot was also pretty useless; I initially thought an eyeshadow base like this one would be perfect for pigments, but the formula is too heavy and thick to allow the powder to be distributed evenly.

courtier

For a daytime look, I was looking for a product that would carry my pigment as well as tone down the glitter. My favourite thing to do this would be Illamasqua’s new Vintage Metallix in Courtier (£16.50). This cream-gel is intended to be used alone (Courtier is a gorgeous “vintage nude” with slight gold shimmer) as a smudge-resistant eyeshadow, however it provides a light but opaque, smooth but slightly tacky base – perfect for a layer of pigment!

For nighttime looks, I needed something that would make my pigments ‘pop’ (cringe… but you know what I mean), so I opted for Illamasqua’s Sealing Gel. This dinky bottle may seem expensive at £7, but it’s uses are endless. It is a mixing medium revered amongst make-up artists for turning eyeshadows into liquid eyeliners. However, if you place a few drops on your eye lid, tap with your finger until it becomes tacky. Once your pigment is applied on top, you’ll see an unbelievable transformation: the colour is bright, the shimmer intense and the coverage even (no lumps of gunky glitter clogging your lid).

This is my version of a day and night look using Pure Pigments (Furore on the left, and Beguile on the right):

How do you make the most of your pigments?

For FOTDs and previews of my blog posts, follow my instagram: http://instagram.com/beautsoup

Hope you like!

Molly x

Essential Kit for Perfect Flicks

I discovered eyeliner when I was 14 and proceeded to smudge it all the way around my eye like Avril Lavigne did in her ‘Sk8r Girl’ video. Cringe.

Though a dramatic smoky eye just isn’t smoky enough without a bit of kohl eyeliner, nowadays I prefer the clean, precise lines that only a liquid pen can offer. So I thought I’d scoot through my essential kit for creating the smoothest curves and sharpest flicks.

Revlon ColorStay Liquid Eye Pen, £6.99.

My starting point is always to trace the line I want to follow. No matter how thin and wobbly this initial line may be, it makes it so much easier to thicken later if you have a base to work from.

For this step I always use this liquid eye pen by Revlon. In my experience, these eye ‘pens’ often have a flimsy nib, making it difficult to draw a solid line without awkwardly trying to lay the pen horizontal to the eye, using the side of the nib instead of the tip.

Revlon’s offering is perfectly sturdy, with just the right amount of give as not to feel sharp against the skin. The issue with this pen is that the nib dries out quickly: its coverage is not entirely opaque and can become quite patchy. In a normal beauty review this is obviously a huge no-no, BUT, for the purpose of tracing a line that will later by thickened and defined, this flaw is really a huge bonus. A drier nib means that the flow of product is reduced, making it easier to control where the liner is going without fear of it smudging or bleeding onto the lid (which then ruins the eyeshadow that took so long to blend… we’ve all been there 😥 )

Rimmel ScandalEyes Precision Micro Eye Liner, £5.49.

So now I have traced my line, I begin to thicken it. Whether you want to taper the line as it reaches the outer corner of the eye, or widen it to create a gorgeous flick, this Rimmel eye liner is perfect. Its tip does not come to a point, but a sloped edge. So while it’s outer corner can be used to create ultra-thin wisps, its flatter edge helps draw consistent, thick lines.

Rimmel Glam’Eyes Professional Liquid Liner, £5.29.

Eye pens can sometimes leave a raw, broken edge, particularly when they begin to dry out. To correct this, my last step is to retrace the line with a liquid liner. This Rimmel liquid liner has a super fine brush that glides smoothly over the eyelid to neaten up any unwanted cracks or wobbles and is perfect for creating the sharpest of flicks.

My tip when using liquid liners would be to apply them in long sweeping motions; though the urge is to draw the line bit by bit to be ultra precise, I have found that the most fluid lines are drawn when the liner is applied with as few motions as possible. Having to continually retrace a line in order to smooth out dips and bumps usually results in eyeliner a dozen times thicker than your original line.

With these three steps – trace, thicken and define – you can go wild with shapes and styles like this 60s inspired graphic eyeliner.

So how do you achieve that perfect liner?

Hope you like!

Molly x

A Twist on a Classic: Winged Eyeliner and a Red Lip

This look is a timeless classic: a pared down eye balances a bold lip in a style that’s effortlessly feminine. Still, it’s always fun to play around with shapes and colours.

I began by covering my eyes with MAC’s Pro Longwear Paint Pot in ‘Painterly:’ what I like to think of as a discolouration corrector for the eye in a pale pink beige. With all my eww-y veins and redness hidden, I stuck to a very neutral palette using a matte taupe transition shade, a gold-speckled chocolate colour in my outer v and a frosted mushroom shade on my lid and along my lower lash line.  

To freshen up the look, I added bright white to the inner corner of my eye and brought it up under my eyebrow where it acts as a conventional highlighter. This gives the illusion of a bigger, brighter eye. To add to this effect, I also mirrored my usual winged eyeliner along the outer portion of my lower lash-line.

10805279_10152400526731128_1525396263_n

For the lips, I stuck to the Monroe-esque red, but added a little deep plum to the centre to create a subtle ombré effect that makes them look full and plump (it also prevents the red-lips-yellow-teeth faux pas).

I’m still on the search for my go-to red lipstick. Being ash-blonde, green eyed and pale skinned, it’s not as simple as choosing what looks like a lovely swatch. So far, my favourite is Shiseido’s Perfect Rouge in RD142 ‘Sublime,’ a richly pigmented cool-toned red.

So how would you put your twist on a classic? Do you have any recommendations for the seemingly elusive ‘perfect red’ lipstick?

Hope you like!

Molly x

Remember to follow me on instagram: beautsoup

Hallowe’en Tutorial: Creepy Doll

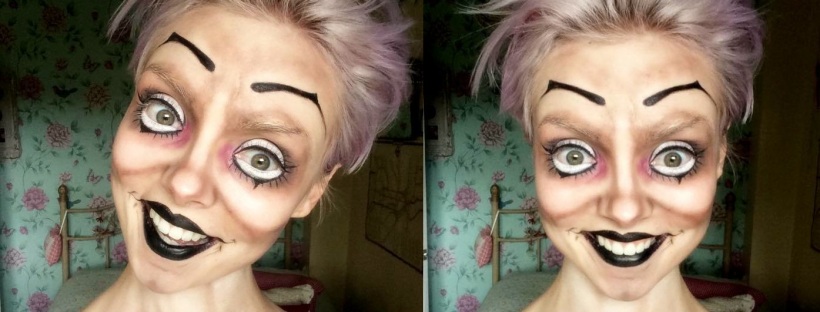
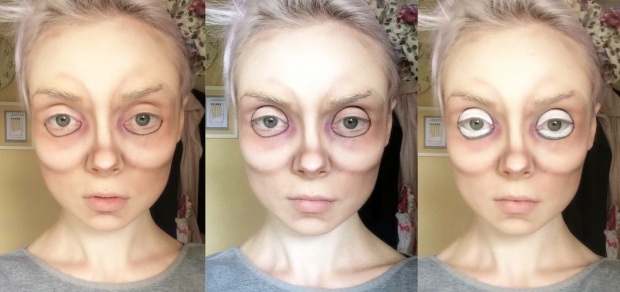
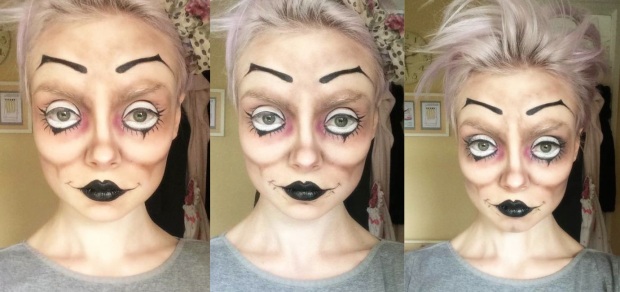
This look is a mixture of many I’ve found on the internet under ‘doll,’ ‘ventriloquist dummy’ and ‘mime’ make-up tutorials. While I think it’s really creepy by itself, it can easily be added to to suit your costume: you could add fake blood, stitches, coloured contacts and lipstick to make this look your own.

Step 1 to 3

1. My relationship with face paint is pretty strained; cheaper, supermarket face paint tends to dry very quickly which can make application difficult. For this look I didn’t want a bright white face just a paler complexion so I mixed the paint with my normal foundation.

My eyebrows are pretty dark so I covered them using a glue stick (rub over the brow to flatten the hairs and allow to dry completely), top with a thick concealer and a dusting of powder.

2. Heavily contour the cheeks, nose, chin, forehead and underneath the eyes using a taupe coloured eyeshadow.

3. Blend fuchsia, red and grey-blue eyeshadow into the inner corner of the eye and bring it down underneath the eye (it helps if you trace where your early morning puffiness would usually be!).

Step 4 to 6

4. Trace a crescent underneath the eye with a liquid black eyeliner.

5. Do the same on the eye lid following the shape of your eyeball to help achieve a circle shape.

6. Colour in the circle using a white eyeliner pencil (NYX Jumbo Eye Pencil in ‘Milk 604’ has a great colour payoff and is really easy to blend). Remember to colour your water line!

Step 7 to 9

7. Using the same taupe eyeshadow draw an upside-down triangle from the base of the cheek towards the jawline. Darken the area around the eye with the same colour. Trace eyebrows using a eyeliner pencil (it saves the mess if you make a mistake).

8. Fill in the brows using a liquid eyeliner – be sure to arch them steeply. Contour around the brows.

9. Cover the lips in your chosen lipstick. Use a liquid eyeliner to bring a line out from the edges of the lips towards the cheek to create a creepy smirk. You could also smudge the under eye circles as I have done here.

Step 10 to 12

10. Draw along the upper lash line with an eyeliner and add wispy eyelashes to the crescent you drew underneath your eyes earlier.

11. Smiling with your mouth closed, trace the wrinkles and lines that appear around your lips with an eyeliner.

12. With your contouring eyeshadow, add vertical lines from your natural eyebrows up towards your new eyebrows and blend slightly to create frown lines. Add false eyelashes. Poof your hair. And ta da!!!

Hope you like!

Molly x

Bringing Back the Mod Look

I recently came across an article on Harper’s Bazaar’s website that claimed that mod hair is making a comeback (here it is incase you fancy a read). With a hair-cut like mine, there’s hardly room for “envious volume” and a “Bardot-inspired bouffant” so, not wanting the mod revival to pass me by, I thought I’d channel my 60s alter ego with a casual cut-crease and a polo shirt dress.

The Wearable Cut-Crease

Tutorials for the cut-crease abound on Youtube and with good reason: it’s a striking look that allows you to use those eyeshadows that always seem to get neglected in the palette. Because your lid is left pale or relatively light and the colour kept to the periphery, the style can withstand the darkest and brightest of colours without looking carnivalesque.

That being said, for a day-to-day look I opted for light and neutral shades. Below is my tutorial:

Step 1: Apply primer all over your eye, right up to your eyebrow, and sketch out a horizontal tear-drop shape across your lid as I have done here with a kohl eyeliner (I use Rimmel Soft Kohl Pencil in ‘Sable Brown 11’).

modeyeprog1

Step 2: Blend the eyeliner up towards your eyebrow using a similar coloured eyeshadow (I used UD’s Naked 2, ‘Taupe,’ with ‘Busted’ towards my outer v to add a bit of depth). Before I do this, I like to place Sellotape underneath my eye to help me achieve a sharp, straight line.

Step 3: Using a flat eyeliner brush and a thick concealer (I use MAC Studio Finish SPF 35 in NC15) retrace the tear-drop shape to neaten up any unwanted smudging. Apply highlighter just below your eyebrow, making sure to blend this into the eyeshadow you have just applied (I use Rimmel Glam Eyes Mono Eye Shadow in ‘Glam Ice’).

Step 4: Add a light colour of your choice to your lid (I use UD’s Naked 3 ‘Dust’). Using a liquid eyeliner, draw a line from the inner corner of your eye to the outer corner and another that curves up to the tip of the tear-drop shape, like I have done in the first picture.

Step 5: This step really tests your patience, but it is hugely important for the end result: gradually build up your eyeliner to create a thick sweeping line.

Step 6: For a daytime look, I like to keep eyeliner to my upper lash line and only apply the taupe eyeshadow underneath my eye.

Step 7: Finish with mascara, and/or lashes, and voilà!

Looking at photographs of Edie Sedgwick or Mia Farrow, the rest of the face should be kept light, fresh and youthful; I skipped the bronzer and opted for a little blusher at the top of my cheeks (I use No7 Natural Blush in ‘Soft Damson 10’) and used my Glam Eyes white eyeshadow as a highlighter just below my eyes and round towards my ears. I wanted to keep my lips equally pale so I used a very sparing coat of MAC’s ‘Snob,’ a light neutral pink.

Of course, there’s plenty of scope to make a cut-crease more dramatic: you can change i
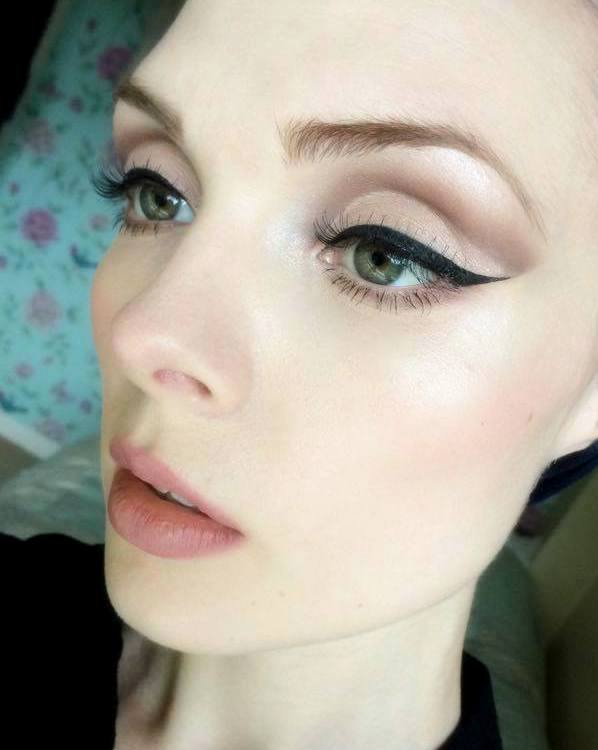
t’s shape, it’s colouring and it’s definition, as I have done in this picture. Instead of the tear-drop shape, I’ve flicked out the corner of the arc to mimic my eyeliner; added UD’s Naked 2 ‘Blackout’ to my crease; and brought the eyeliner underneath my eye into a point at the inner corner to create a cat-eye effect.

The Outfit

modoutfit

Dress, Cooperative at Urban Outfitters;

Shoes, Dr Martens (Polley); Jacket, Barbour.

For this look, with quite intricate make-up, I wanted to wear something that was a little boyish, but at the same time feminine (a style typical of Twiggy with her pixie cut and boxy, short dresses). My polo shirt dress is perfect; though it’s colour and shape first appears simple, the material falls perfectly to create a feminine silouhette. My oversized Barbour jacket and Dr Martens, both iconic in men’s mod fashion, add a clunky, kooky feel to counter my dress, bringing the look into the twenty first century.

What elements of mod fashion will you be adopting this autumn?

Hope you like!

Molly x

Three Looks with: Urban Decay’s Naked 2

With the cold weather setting in, the taupe-hued neutrals of Urban Decay’s Naked 2 palette are perfect for autumn. Here are three different looks that move from a minimal day time effect to my go-to cat-eye and then something a little more dramatic.  

     Look One:

   – Tease blended from the outer  to inner crease and on the outer lower lash line.

Chopper on the outer portion of my lid and the middle lash line.

Half-Baked on the inner portion of my lid and inner lash line.

Booty Call along my brow bone and in the inner corner of my eye.

I’m not sure if Foxy is intended to be the palette’s highlighter, but on my (very) pale skin the yellow tones tend to make me look a little ill so I prefer to use Booty Call or, even better, Rimmel’s Glam Eyes Mono Eye Shadow in 100 Glam Ice (£4.49).

10711700_10152318739671128_945233244_n

Look Two:

Here, I just added to the colours used in Look One:

YDK (my favourite) into my crease and under my eye.

– Busted into my outer v.

– Chopper across the whole of my lid.

– Snakebite on my inner lower lash line.

Using Revlon’s Colorstay Liquid Eye Pen (£6.99), I traced a thin line along my lid (avoid drawing the eyeliner too close to the inner corner of your eye. This can make the eye look smaller if not balanced with an equally intense colour in the outer corner, as in Look Three). I use this eyeliner almost everyday so the tip is too blunt to achieve a precise flick. For that I recommend Rimmel’s Glam Eyes Liquid Eye Liner (£5.29) which has an extra thin brush – perfect for the sharpest of points!

  Look Three:

I don’t often have the time (or the patience) to risk attempting a full-on smoky eye, but when I can be bothered I always love how dramatic it looks.

The neutral colours in the palette are fairly tame: the darkest colour Blackout stands out against the subtle beiges and coppers that go before it so the key to this look is blending!

Adding to Look Two, I used:

Busted along my crease and blended up towards the brow bone.

– I stuck Sellotape along my outer eye to help me achieve a nice sharp line and then blended Blackout into my outer v towards the centre of my lid, up towards the outside of my eyebrow and finally under the lower lash line (I intentionally didn’t go too close to the root of my eyelashes so I could still see a little glimmer of Snakebite underneath my eye).

– To slightly soften the intensity of Blackout, I blended it out under my brow bone using Tease and then reapplied Booty Call as a highlighter.

I brought the eyeliner right to the inner corner of my eye, thickened the line across my lid and widened my flick for a more dramatic look. As you can tell, my eyelashes in Look One are considerably less long and lovely than in Two and Three (*sad face); I’ve been trying out Rimmel’s new ‘Wonderfull’ mascara (£7.99) but usually give in and opt for falsies. I used Eylure’s Naturalites Lashes 070 (£5.39) in Looks Two and Three, they’re a versatile length that suits both daytime and nighttime looks.

Hope you like!

Molly x