
Illamasqua’s Gel Sculpt was heralded as the new thing in contouring. It would usher in a new era of defining the face, they said. But, for what it’s worth, I’m unconvinced.
I remember the social media posts leading up to its launch: monochrome, abstract, mysterious. The hype surrounding the unveiling was huge and I was completely sucked in. I had my phone on my desk at work, continually checking my emails until it dropped into my inbox: ‘Available now.’ But then the delivery arrived and compared to the enormity of its billing, the box was teeny tiny.
It’s so good that you won’t need to use a lot…It’ll last forever, I told myself.
And yes it probably will, because – two months later – I’ve only used it once.
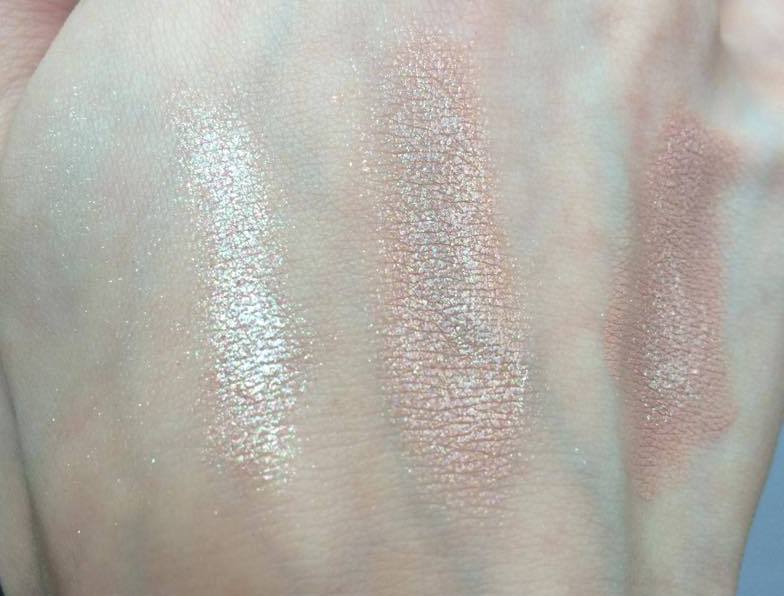
Take off the cap and you’ll find a cylinder of solid gel (it reminds me of roll-on deodorant) with a fresh floral smell. Weird, but I can handle weird. Scoot the gel across your hand and it gets weirder. What, in the bullet, looks like the perfectly cool, deep  taupe transfers to the skin as a pale coffee hued smudge. Gel Sculpt is really a glorified cheek tint and a strange one at that.
In their quest to create the first ‘natural’ looking contouring product, Illamasqua have skimped on the colour-punch that typifies their brand. Silhouette, so far, is the only shade intended to ‘sculpt’ the face so I understand that they needed to produce a shade that would suit every skin tone, but the truth is there isn’t a universal colour that will please everyone and, even if there was, I don’t imagine it would be as warm toned as this. I guess the name ‘Silhouette’ implies its intention to mimic natural looking shadows, but I can’t help but think it should be called ‘Obvious.’
The picture on the left was taken after just one stroke on my hand, immediately after application. As you can see, the colour is wish-washy, the coverage sheer and the finish oddly glossy. When I first used this on my face, I quickly applied more coats, presuming the colour would deepen as desired, but the sepia only became more opaque… in patches. With a slight hesitation, I took up my make-up sponge to dab off the excess and start again, but by that time the gloss had turned to matte, the gel had dried and my contour was fit to survive pollution on a nuclear scale.

L-R: One stroke; Two strokes; A desperate amount of strokes.
A waterproof contouring product that won’t fade or rub away throughout the day? Amazing!
If you actually like it…
I just can’t seem to get my head around this product. I’ve tried applying it straight from the bullet onto my cheeks, but it dries too quickly leaving an unyielding streak of bronze that refuses to blend. I’ve also tried Illamasqua’s recommended method of application: the gel is applied to the fleshy part of your palm beneath your thumb on one hand; then bounce your palms together to distribute the product over both hands; finally, with your thumbs parallel to your ears, dab the product onto your cheeks, cradling your cheekbones.

What I mean by “the fleshy part of your palm beneath your thumb.”
This method is great for creating a subtle hue around the face… if you’re careful. But as there’s little to no precision involved, it’s quite difficult to stop the product from straying into your hairline or down onto your jaw (and there’s no hope of neatening it up afterwards). I tried this method just before writing this post and had to apply more foundation underneath to try and sculpt some sort of shape from the brown splodge, which I eventually completely covered in NYX’s Taupe blush. Fail.
Perhaps, in a different shade, I’d appreciate Gel Sculpt a little more. The formula is innovative, but fraught with practical issues like ‘how on earth do I apply this?’ If the gel wasn’t to set as quickly as it does, it would be a whole different story, but for now it will sit gathering dust on my dresser.
What do you think of Illamasqua’s Gel Sculpt?
Hope you like!
Molly x


 They’re now an essential part of my make-up routine, adding extra dimension to matte shadows, extra oomph to highlighters and extra sparkle to lip-gloss and nail polish. I was watching one of Mykie’s Youtube tutorials when she used this amazing iridescent powder to brighten the inner corners of her eyes. I’d only vaguely heard of Sugar Pill before and assumed, as an American brand, it wouldn’t be easily available in the UK. But thankfully, a local make-up boutique stocks their entire range – so here we are!

 I had just hit pan in my usual powder blush (No7’s ‘Soft Damson’) when I saw this advertised as part of Illamasqua’s January sale at half the usual price. As it would be my first time using a cream blush (and I’ve heard the horror stories about how difficult they are to apply correctly), I confess that I would not have paid the full £21.50 for such a risky item. At just over ten pounds though, it was a bargain!
 So in my contouring post, I said that I was waiting for Illamasqua to release a white/silver version of their Gleam highlighter. Well, alas, they haven’t, but I’ve found a brilliant alternative! MAC’s Cream Colour Bases are verrrrrry popular due to their versatility – they can be used as highlighters, concealers, blushers, eyeshadow bases and lipsticks.
 I love purple in all its shades so this was an obvious choice for me. With Spring on the way, it seems the season for vampy lips is coming to a close, but I don’t see why dark colours can’t be used to add a bit of drama to a floaty summer dress and sandals. Right?! Smoked Purple is a deeper, cooler tone than Cyber (which I’m also a fan of) so would probably suit a wider variety of skin tones. I’m not sure whether it’s just luck with MAC’s mattes, but my Smoked Purple is a lot creamier than my Sin and Styled in Sepia. With any dark colours, though, it’s worth mentioning that even the slightest bit of dry skin will snag and catch the colour making it highly noticeable – I now wear tons of lip balm (my tasty new EOS balm) as often as I can to stop my lips going crispy in this cold weather.


 For nighttime looks, I needed something that would make my pigments ‘pop’ (cringe… but you know what I mean), so I opted for Illamasqua’s Sealing Gel. This dinky bottle may seem expensive at £7, but it’s uses are endless. It is a mixing medium revered amongst make-up artists for turning eyeshadows into liquid eyeliners. However, if you place a few drops on your eye lid, tap with your finger until it becomes tacky. Once your pigment is applied on top, you’ll see an unbelievable transformation: the colour is bright, the shimmer intense and the coverage even (no lumps of gunky glitter clogging your lid).


 the colour means that, when applied to the cheekbones, nose and forehead, the whole face looks fresh and gleaming. However, as you may be able to tell from the picture, it does not offer as full a coverage as my MAC alternative.
