Jeffree Star’s ‘Beauty Killer’ Palette

Though it sold out in a flash, Jeffree Star’s debut eyeshadow palette has divided opinion. It’s too bold for some, too ‘safe’ for others. But for me, the palette is undeniably the embodiment of its maker, a true chameleon.

IMG_8928

Packaging

What first struck me was the size of the palette. It’s huge! That being said, it is very thin, so it still won’t take up too much room in your suitcase/zuca. Apart from its size, though, the outside of the palette is perhaps a little…underwhelming? It’s a lovely shade of pink, yes, but the logo seems a little off-centre given its outrageous font (just look at that ‘B’).

IMG_0454

What’s lacking on the outside is more than made up for on the inside. I don’t usually gasp when I open palettes – maybe the odd ‘oooo…’ – but I was shocked by how stunning this is. Everything is oversized; there’s a huge mirror, big enough to actually look in when using the shadows and, speaking of shadows, they’re massive too. Apart from their size, each shade is beautifully embossed with the Jeffree Star logo for that extra slice of glam. It’s almost too pretty to touch. Almost..

Shades

Star Power – Neon Pink (matte)

Princess – Pink Pearl (metallic)

Violence – Cranberry (metallic)

Rich Bitch – Gold (glitter)

Courtney – Peach Beige (matte)

Expensive – Teal (metallic)

Confession – Brick Red (metallic)

Vanity – Deep Brown (matte)

China White – Cream (matte)

Black Rainbow – Black (multi-coloured glitter)

IMG_0463

IMG_0465

The descriptions above are of the colours as they swatch, not necessarily how they look in the pan. Both ‘Violence’ and ‘Vanity’ look very, very different in the pan; ‘Violence’ looks metallic violet, but swatches with a strong red undertone; ‘Vanity’ looks like a really unusual warm grey, but swatches a cool dark brown. I have to confess, I was a little disheartened when I swatched these two, but they do help to balance the other bold colours. They help make the palette more versatile. You can quite easily use only this palette to create a multitude of different looks because of the great mixture of neutral/bold, matte/metallic.

Just before releasing his palette to the public, Jeffree Star previewed it on his Youtube channel (screen-shotted below from makeup tutorials.com). As is shown here, the colours were chosen with the intention that they be split into four quads.

vlcsnap-2016-05-17-22h29m30s100vlcsnap-2016-05-17-22h29m19s227-2vlcsnap-2016-05-17-22h29m53s68vlcsnap-2016-05-17-22h29m43s213

This method of selecting four complimentary colours makes the palette particularly easy to use for beginners or those wanting to dabble in a bit of extra colour. Each quad is extremely wearable with Jeffree Star’s signature edge, be it a pop of gold glitter or neon pink. Yes, the combination of metallic teal and Barbie pink may be too OTT for some, but without these bold shades the palette would be a little flat. It certainly wouldn’t be Jeffree Star.

Pigment + Texture

To cut a long story short, the pigment is AMAZING. The matte shadows are slightly chalkier than the metallic, but that’s to be expected. The texture is much like Sugarpill shadows, and they pack the same punch and blend like a dream. The only exception is ‘Rich Bitch,’ which is more like a pressed pigment/glitter than an eyeshadow. It kicks up quite a lot of fall out, but can be lightly pressed onto the eye for a glitter effect or blended out for a more even coat of colour.

My swatches were taken without primer and the coverage of (almost) every shadow is brilliant. The metallics glide on without patchiness and the mattes, though they require a little bit more patience, are equally opaque. I was hugely impressed with ‘Black Rainbow;’ it can be hard to find a good black shadow, there’s plenty of ‘charcoals’ on the market, but this is a true, deep black.

IMG_0461

Overall, I love this palette! The colour choice it offers is unlike any other palette I own. It’s the perfect balance of sensible and bold, for the office or for a night out on the town. It’s a great introduction to brights for beginners and challenges the experienced makeup junkie with some new colour combinations.

Will you be trying ‘Beauty Killer?’ Check it out here.

Colourpop Super Shock Shadow in ‘Bae’

Here’s a snap of my first ever Colourpop eyeshadow, ‘Bae,’ a ‘rich eggplant purple with an emerald and turquoise glittery duo chrome metallic finish.’

IMG_0408

But, first thing’s first, what is it?

Formula 

According to Colourpop, a Super Shock Shadow a ‘long-wearing crème powder formula’ with an ‘elastic texture.’ And well… they’re right. But is it a cream or a powder? Weirdly, it falls somewhere in-between. At first touch in the pan, the product has a mousse-like consistency, velvet-soft and almost bouncy under pressure. As soon as it gathers on the finger or brush, however, it sets to a super-fine powder.

IMG_0409

IMG_0411.JPG

Once it sets, too, the powder is there to stay. I was able to wear this sans primer for around 8 hours without seeing any creasing. This is great news for both oily and dry skin alike: the super lightweight formula and silky finish is less likely to cake or go crusty throughout the day.

It is also compatible with other shadows; typically, it’s recommended that you don’t apply cream shadows over powders, unless you want a gunky, flaky mess. But as this sets to a powdery finish, it can be layered and blended with other powder shadows without any fuss. Win!

IMG_0418

Application

Being half cream/half powder, Colourpop shadows can be a little confusing: how on earth do I get it on my eyelid? As with any shadow, you can use your finger or a synthetic brush, but each with different results.

Below, the swatch on the left is applied with my finger and, on the right, with a brush. Applying with your finger reduces fall out and allows for a more consistent, though not very precise, application. A brush, on the other hand, increases the likelihood of fall out and patchiness, but does allow you to be more precise.

IMG_6471

IMG_6470.JPG

In my opinion, the best method involves a combination of both finger and brush: apply with fingers for the most part, where most pigment is needed, and then blend out with brushes.

As you can see from the photo above, sweeping your finger across the pan doesn’t gather enough pigment to really do justice to the eyeshadow. I’ve found that the best method is to scoop the product. Though this does risk messing up the shadow’s pretty patterned surface, the difference in colour pay-off is HUGE.

IMG_7312

IMG_7315.JPG

An easy to use, if unusual, formula in equally unique shades, Colourpop shadows are a must-try for any makeup fan who wants to shake up their collection with some new pops of colour. Which will you be buying? Check them out here.

My Custom MAC Eyeshadow Palette: Part 1

I was a few steps away from the checkout, MAC’s Warm Neutrals Palette in hand, when I thought… I actually won’t use around half of these colours. It doesn’t include any of the shadows I’ve been lusting after for a while now and, in my opinion, there are a few too many yellow-y honey shades and no “curve-ball” colours that would really mix up my every day looks. For £65, it’s a pretty steep investment in something I wouldn’t use all that much. 

So I put it back and decided to build my own custom pro palette.

11072574_10152673001311128_530462597_n

MAC eyeshadows aren’t cheap by any means (individual pans cost £10) so building your own 12 piece palette will cost just under double the price of the pre-made ones. But if being able to pick out your own shades means that you’re more likely to use them at every opportunity, the extra expense is surely worth it. 

The range of colours and finishes offered by MAC is quite overwhelming when you’re trying to choose just twelve. Whenever I visit my local store, I go into a heady daze where everything and anything is beautiful, wonderful… and affordable (eesh), which doesn’t make for easy decision making. 

But I’m going to (try and) be sensible. I’ve decided to choose 4 matte transition shades, 4 warm neutrals (frosts/shimmers) and 4 more unique, out-there colours to mix up my go-to looks. Here are my first 6 beauties:

 Mattes:

11084430_10152673001286128_1269759344_n

L-R: Wedge, Quarry, Handwritten

Wedge: This is one of MAC’s most popular transition shades, a lovely warm beige. Given that I’m a sucker for warm colours, I was surprised to find that I don’t actually own a matte in this colour, so it was an obvious choice to help blend other shadows. Its neutral hue and matte finish provide a “no make-up, make-up” look which is perfect for Spring and helps to add definition to the eye with subtle depth. 

Quarry: A lesser known shade, Quarry is a unique grey-beige matte with a cool mauve undertone. In comparison to Wedge, Quarry is great for blending out cooler shades of grey, pastels and silver. Again, a great staple for lighter Spring-time looks when you want to tone down that dark smoked out eye.  

 11081649_10152673001251128_1376393010_n Handwritten: Okay, so I know I’ve just said that I’d look to tone down a smoky eye for Spring, but there are some days when nothing else will do. If in doubt, smoke it out, right?! 

Black smokes can look a little heavy on my face, particularly if my eyes are tired and a little puffy, so I usually rely on chocolate browns or deep burgundies as my go-to smoke shades. Handwritten is ideal for this, either placed across the lid or blended into the crease. 

Warm Neutrals:

11056723_10152673001241128_432067580_n

L-R: Satin Taupe, Sable

Satin Taupe: My first “proper” eyeshadow was Bare Minerals’ Loose Shadow in the colour ‘Celestine,’ a beautiful mid-tone taupe with a gold shimmer. I must have worn it almost every single day whilst I was at university, no matter what the occasion. Since leaving (and having an income!), my makeup collection has grown and Celestine has gotten lost – or ‘over-shadowed’ (BADDUM…) – by my other palettes. When I swatched Satin Taupe, it instantly reminded me of Celestine (if not as shimmery) and I knew I had to have it. 

Maybe it’s just me, but I often work on creating multi-tonal smokes in my crease and underneath my eyes, but can sometimes be left stumped as to what to use on my lid. I need a neutral colour with enough oomph to stand up to dark smokes and enough interest to work well be itself. Satin Taupe is the answer!   

11081663_10152672999761128_1406915266_n 
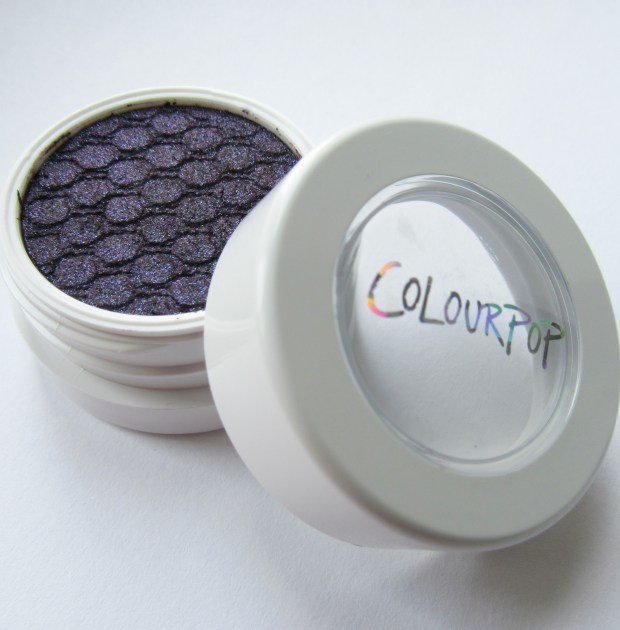
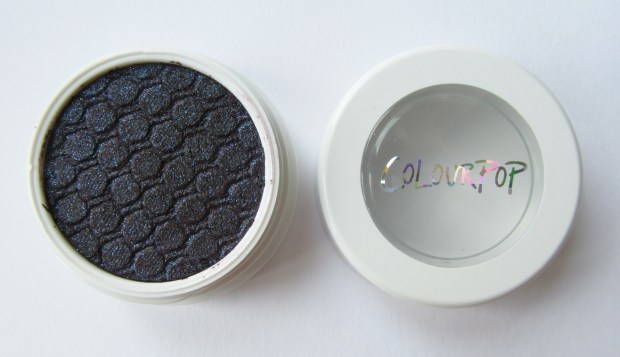
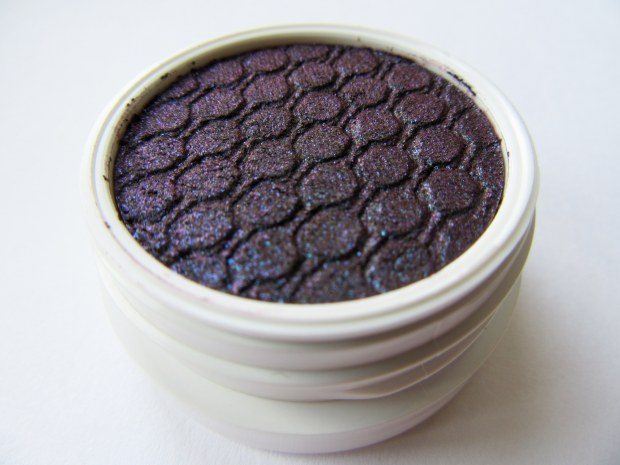
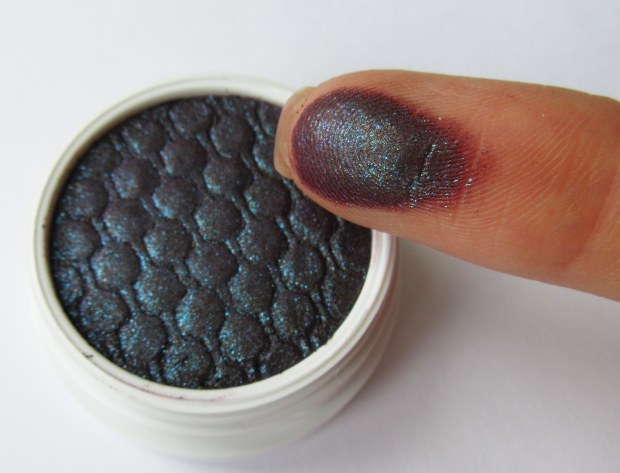
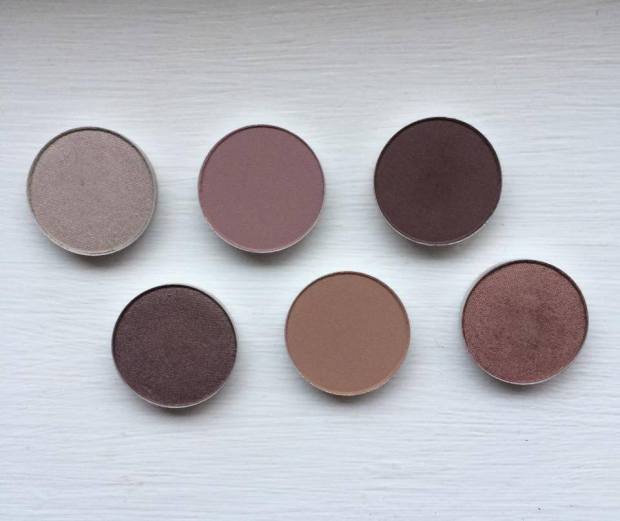
Sable: This was the first shadow I was drawn to when scanning the shelves at MAC. Sable is a warm, earth coloured red – the marsala shade – with a delicate gold shimmer that is not at all ‘glittery,’ but rather has a gorgeous pearlescent finish. I tend to use this in a similar way to Handwritten to mix up my usual smoky eye looks. Though classed as a ‘shimmer,’ Sable’s shine is subtle enough to be smoked out in the crease without causing your eyes to glimmer like beacons – an absolutely beautiful shade perfect for switching up classic looks for those summer-time date nights!


Curve-balls:

11046895_10152672999771128_1908136478_n 

Vex: This is a strange colour, but strange in a really really good way. It doesn’t look much of a “curve-ball,” but it’s duo-chrome finish is so difficult to capture on camera. While it looks like an ordinary silver grey shadow in some lights, in others it shines like a pearl with pink, purple and green hues. The best way to draw out the multi-dimensional colour of this shadow is to foil it with MAC’s Fix+ or another mixing medium. I’ll definitely be making the most of this shade this Spring as it makes for a gorgeous compliment to pastels and smokes alike, it’s great for adding a quirky edge to simple looks.

MACVex  So, that’s half of my collection already sorted! Ideas for my next 6 shades include ‘Cranberry,’ ‘Pink Freeze,’ ‘Mythology,’ ‘Plum Dressing,’ ‘Crystal’ and ‘Trap’ with possible curve-balls being ‘Plumage,’ ‘Sumptuous Olive,’ ‘Jest’ and ‘Lucky Green.’ 

What are your favourite MAC shades? Would you consider making your own custom palette?

Hope you like! 

Molly x

Review: Illamasqua’s Embellish Eye Trio

I was sceptical as to whether the huge reduction on this set was because it wasn’t very popular. Was it the case that Illamasqua needed to shift an old bulk order that wouldn’t sell? Surely not… The gel liner? Unpopular??? I can’t speak for the brow gel as before now I’ve stuck to relatively cheap pencils to lightly shade in my eyebrows. But to think that ‘Embellish’ isn’t popular either astounds me. I already own the Vintage Metallix in ‘Courtier’ – a light beige-pink with a soft gold shimmer – and ‘Embellish,’ a medium brown with the same hint of gold, was next on my list.

On reflection, maybe it was just too expensive. The thought of buying this trio at the original price of £49.00 made me sweat a little, so when it was first reduced to £25.00, I added it to my basket. But with reluctance – it was still just that bit too expensive to be a sale bargain (though I then spent £26 on four new eye shadows without a second’s thought *facepalm*). Finally, after a long day at work, I received the email. ‘FINAL REDUCTIONS.’ And there it was. £14.70.

FOURTEEN POUNDS.

Whaaat.

10984772_10152592768201128_1301994582_n

Bish, bash, bosh (and after a slight skirmish with PayPal), it was mine.

As a quick aside… Illamasqua’s delivery system is second to none, so if you can’t find something in store, don’t hesitate to order it online. I always opt for their free delivery, quoted as 3 – 5 working days, but have received my items within just two days of ordering. You even get a text with the name of your delivery driver and a verrrrry exact ETA (my last one was 11:42 to 12:42).

So these three gems arrived in their swishy presentation box and I was quick to dig in.

Brow Gel in ‘Strike,’ (single pot, £18.50)

10979407_10152592768596128_1828835376_n

As I said earlier, though I envy those brows ‘on fleek,’ I don’t think a heavily sculpted eyebrow would suit my face and I can’t afford too dark a shade with my complexion and hair colour. When I googled Strike it seemed an ‘okay’ colour – maybe I’d get away with it – but I had a feeling that it would end up getting dusty at the back of my make-up table. But, two weeks in and I’ve used it every day.

‘Strike’ is a medium brown with a cool undertone so it suits my naturally ashy hair perfectly. I’d particularly recommend it for those with bleached or coloured hair like mine – pastels or brights – as it is a ‘safe’ colour, not too dark, not too light, not too blonde, not too brown. ‘Safe’ seems like an awful word, but I mean it in the best way: as much as I’d like to walk around with lilac eyebrows, I haven’t got the guts to bleach and tone them, so for now I need a neutral colour that doesn’t look to obvious.

In terms of application, I use my Sigma E65 Small Angle Brush to apply the gel. It has quite a loose consistency so the smallest dot of product will easily cover one brow. Once it dries, though, it won’t budge. Naturally, some of the gel can stick to your eyebrow hairs so I like to run over them with a spoodle just to remove any excess product.

I would recommend this for those, like me, who are looking to ‘tweak’ their natural brows, either by filling in gaps or neatening edges as the gel, by nature, is well pigmented, but has a semi-satin finish. If you are looking to re-sculpt your brows, then I think a product with a thicker consistency, higher colour pay-off and a matte finish would be better suited – like Illamasqua’s Brow Cakes, which have a powder/paste-like texture and come in a range of colours (‘Strike’ is the only brow gel available at the moment).

Precision Gel Liner in ‘Infinity,’ (single pot, £18.50)

I bloody love this stuff. Compared to the epic fail that was Urban Decay’s Gel Liner, Illamasqua’s version is what dreams are made of.

The key to a good gel liner is its consistency; you need it to be loose enough to apply it in as few strokes as possible to achieve a sharp, fluid line. This liner has a very similar texture to the brow gel in that it applies thinly, but with great, consistent pigmentation. And unlike a liquid liner, the product won’t crack or flake on the eye. I tend to apply my liner in layers, starting with a skinny flick and adding an extra layer until I have the thickness I want; doing this with a liquid liner can lead to cracking as the product begins to dry. And once it’s cracked, with the slightest touch or puff of wind, it begins to flake away.

A gel liner, by comparison, dries with some degree of ‘flexibility’ meaning there’s no risk of unwanted negative space. I’d very highly recommend this for anyone who’s go-to look involves eyeliner, but to get the most out of this product, make sure you buy a suitable brush to apply it with!

Vintage Metallix in ‘Embellish,’ (single pot, £16.50)

The Vintage Metallix are a collection of three gel-like eyeshadows and are amongst the newest products produced by Illamasqua. Each one – Courtier, Embellish and Bibelot – have a muted, ‘vintage’ colouring with a delicate gold shift.

I first bought Courtier, a lovely pink-beige, under the impression that it would act much like MAC’s Paint Pot (mine had turned horribly dry and thick at the time – I’ve rescued it since!). The Metallix can work this way, pigments cling to them particularly well and powder shadows can be easily blended into them, but their intended use is as cream eyeshadows. Once the cream has had time to set, it won’t be going anywhere; the Metallix’s staying power is amazing with and without primer so they’re a good choice for most skin types.

Embellish is, I think , the secret weapon to a smoky eye. If you’re not too confident working with darker shades, I’d definitely recommend this. Its rich chocolate colour is just dark enough to make an impact, but not so dark that it seems to close the eye up, as some deep/black shadows can if not applied just right. The hint of gold lends itself to both day and night looks and can either be exaggerated by adding a gold pigment or muted with darker shadows and lots of liner. With just a dip of the finger and a swipe of the lid, you’re done! There’s no need to fret about placement or blending due to its loose, buttery texture. It really is fool proof!

This set was most definitely a bargain at just £14.70. I’d even stretch to £25.00 (£49.00 still sounds like a lot of money…)! I would wholly recommend each of these products – whether bought separately or in this set – each have their own way of speeding up the getting-ready process.

Would you consider the Embellish Eye Trio?

Hope you like!

Molly x

My First Purchases From NARS: Audacious Lipstick and Eyeshadow

In my local Selfridges store, the Illamasqua counter is only metres away from the NARS counter, but it had never troubled me to go to ‘the other side’ until my last visit when I caught sight of the Audacious lipstick stand.

I’d seen numerous blogs raving about them, so I thought I’d pop over and have a cheeky swatch. And that was that. I fell down the rabbit hole into a beautifully luxurious NARS-y wonderland.

Well, almost. The three sample lipsticks that caught my eye were decidedly chewed and when I summoned up the courage to buy one without testing it, I was told there was none left in stock. Frustrated and geared up to buy something, I looked over the eyeshadows, found the one I fancied, and was told that, again, there was no stock.

2015/01/img_0498-1.jpg

Eyeshadow in ‘Strada’ (£18.50) and Audacious Lipstick in ‘Anna’ (£24)

I looked e.v.e.r.y.w.h.e.r.e and eventually found them on ASOS’s site, two days later and here they are!
Packaging

As I opened the delivery box, the first thing I noticed was the size and weight of the products. The lipstick is the same shape as my Illamasqua ones, but bigger and heavier (!). It feels like a superior, quality, expensive product. The eyeshadow, too, sits in a smart, compact clam-shell style box with a cute little mirror on the inside. The only issue is its rubberised coating which shows mucky fingerprints like WOAH.

But the lipstick, in particular, is finished with little touches that makes it just that bit better than the other mid-range brands. The lid is magnetised – a handy little extra which means there’s no chance of it falling off in your handbag – and the actual lipstick is engraved with the NARS logo, which might add nothing to the product itself (especially when you’ve used so much that it begins to read ‘ARS’) – but it feels special all the same.

Colour

It was verrrrry difficult to decide what lip colour to go for; the line has 40 shades in total from the lightest nude to the deepest purple – there is a colour for every style and occasion. I’ve got a thing for dark reds/deep plums so was instantly drawn to Charlotte and Ingrid, but with Spring fast approaching, I thought it would be more worthwhile to invest in a light, versatile colour.

2015/01/img_0495.jpg After much deliberation (I even thought about blowing my wages on the whole collection at one point), I chose Anna. I’ve read quite a few descriptions on the internet where Anna is called a ‘smoky rose.’ I can see what they mean… kind of. To me, ‘smoky’ suggests dark, warm colours, like MAC’s Smoked Purple, but Anna is actually a medium, cool-toned, pink-mauve shade. It is the perfect pink; not pastel, not Barbie, but somewhere in between.

Unlike the lipstick, I didn’t choose Strada, Strada chose me ❤ It is an absolutely beautiful eyeshadow unlike anything I’ve seen before. Pastels are set to be big this Spring and many brands have released their own lilac shadows in various hues, think Illamasqua’s Creep. What is unusual, however, is Strada’s gold shift. I’ve never thought to pair lilac with gold, but assumed its cool tones would work better with an equally cool silver highlight, like Sugarpill’s Frostine. The fine gold shimmer that runs through this shadow is not only unique in itself, but also gives you more freedom to experiment with the rest of your makeup, creating new combinations of cool and warm colours.

2015/01/img_0502.jpg Application

The lipsticks in the Audacious range are dubbed as the ‘one-stroke’ wonders, so highly pigmented that there’s no need to swipe your lips more than once. I was sceptical as my lips can sometimes be a little dry meaning that one coat can look quite patchy. But it is actually true! With one coat, my lips were covered! The colour wasn’t as strong as I would have liked, but they really were covered. I tend not to apply more than two coats before I am happy with the intensity of colour and the even coverage. Anna has a lovely buttery texture that allows the colour to transfer easily to the lips, but its semi-matte finish means that – without going wild at the buffet – it can stay put for almost 4 hours before wearing away from the centre of the mouth.

10933061_10152553275486128_1167534661_n

Strada, on the other hand, isn’t so pigmented. I think I’ve been spoiled by the colour-rich, crazy pigmented shades like those of Illamasqua and Lime Crime, but it certainly takes a lot more effort to bring out it’s gorgeous colour. This could well be because it is a shimmer rather than a matte shadow as shimmers are notorious for not having such a strong colour pay-off. In the picture shown below, I applied around three coats of the shadow with a soft blending brush. As it turns out, this shadow doesn’t respond well to foiling; wetting the mixture brings out the shimmer more so than the colour. To achieve the most true colour, I’d recommend using a white/extremely pale eyeshadow base instead. NYX’s Jumbo Eye Pencil in Milk (my hero) is perfect for this.

2015/01/img_1486.png

The intense gold colour is Illamasqua’s Furore, see my earlier blog post on pure pigments.

These won’t be my last purchases from NARS. In my opinion, the tangible quality of the products makes that extra £5-£10 well worth it. I’m already trying to choose my next lipstick, Anita or Bette?

What are your favourite NARS products?

Hope you like!

Molly x

Review: Lime Crime’s Venus Palette

Introducing the “newtrals,” Lime Crime’s Venus mixes “Botticelli’s classical painting with the rebellion of the early 90s” to create the grunge palette.

I thought I’d collected my fair share of ‘warm’ eyeshadows: think MAC or Sigma’s ‘Warm Neutrals’ and you think taupes, caramels, the token frosted copper and highlight. But for Lime Crime, warm means deep red, russet and chocolate.

Needless to say, I saw the swatches on Instagram and fell head over heels, but was a little anxious as to how the ‘oranges’ and ‘reds’ (for want of more poetic titles) would translate on my fair skin. The smoked out bruised look may have worked in the 1990s, but this is 2015 and I have to pop in Sainsbury’s without any stares.

So when Santa left this under the Christmas tree, I got to work testing different looks and combinations. Here are my thoughts:

Colour choice: This is the best part of the palette and, perhaps, the most important part. There is a good even range of dark and light shades, all with their own unique tones that are unlike any shadows I’ve tried before. They are, too, surprisingly versatile; Icon and Divine are especially useful for giving a new twist to my go-to looks. That being said, it is worth being careful not to go wild with the reds; blended too far around the eye and it won’t be pretty, more sickly.

The wide range of the colours provided means that there will be at least one that isn’t for you. For me, this is Rebirth, the colour of ‘an overripe nectarine’ (…) or a bold medium orange. It is a beautiful shade, but will not work with my skin tone. Though I do like to use a light dusting on my cheeks over my usual blusher, just to add a different hue.

I would also like Aura to be a little lighter. As the palette’s highlight, for me, Aura would work better as a cream/champagne rather than a gold as I find myself having to brighten it with a whiter shade (usually UD’s Bobby Dazzler). Although, without it’s subtle metallic colour, the palette would be a little flat. The jury’s out!

Pigmentation: Below are the official swatches that I originally saw on Instagram. As you can see the satin shades, Aura and Shell, are particularly bright and bold, and the mattes deep and opaque. Lovely. Though I’d imagine that Doe Deere (the inventor of the palette and owner of those fingers) used some sort of eyeshadow brightener to boost the colours. Lime Crime actually does produce a brightener, but it’s £13.50 and I’d rather spend that amount on a new velvetine.

The pigmentation, then, without such a brightener can vary. Matte shades tend to need two or three coats if they’re going to look as deep and consistent as they do here. I usually cover my eye with NYX’s Jumbo Eye Pencil in Milk to achieve the most ‘true’ colour; the white base serves as a brightener would, but costs almost a third of the price. The Satin shades have a slightly better consistency, but also need a little help from a mixing medium if they’re going to look as bold as they do above.

Texture: The texture reminds me a lot of Sigma shadows. They seem ‘thin’ on the eye. By that I mean weightless, with a velvet feel. While that’s lovely, there is a fine line between that and ‘chalky.’ The mattes, in particular, can feel chalky if applied in layers and do have a fair amount of fall-out (but I’m yet to use a palette that doesn’t).

Special Mentions:

Divine: ‘Dusty Stone’

The rather bleak description does this colour no justice at all. Divine makes the perfect transition shade, but I also like to use it alone to shade my crease for subtle everyday looks. The more it is blended, the more the colour seems to develop from an average taupe to a lovely pink-toned beige. It’s like MAC’s Velvet Teddy in an eyeshadow!

venus

Venus‘The Colour of Bruised Fruit’

It’s UD’s Vice 3’s Sonic, but better. Venus is a gorgeous red-brown with a light satin finish. Despite it’s unusual colour, it is surprisingly versatile and can work with similarly warm tones as well as navy, deep purples and silver. An essential shade for that sultry smokey eye.

Creation: ‘Rust Brown’

I left this colour untouched for a long time assuming that it was too orange-y for me to pull off, until one Sunday afternoon – pjs on and nothing to do – I decided to test it out. I absolutely love it! Creation is an unusual burnt orange colour that looks beautiful when paired with Divine. A must-have for those with green eyes!

In this look, I used Divine, Venus, Creation and a little Icon on my eyes, Aura to highlight my cheekbones and Rebirth as blush:

10893332_10152537124636128_354730897_n

What do you think of the Venus palette?

Hope you like!

Molly x

How to Make the Most of Pure Pigments

It’s the perfect time of year for adding a touch of sparkle to your make-up routine and pigments are by far the best way to do so. With Christmas parties and New Years Eve in mind, I recently bought both Beguile – described as “light shimmer” (?) but actually an iridescent white – and Furore – “champagne peach shimmer” – by Illamasqua.

Having swatched them under bright lights in store, the colour and sparkle was self-evident, I had to buy them! But when I applied them to my lids the next day, I was a little underwhelmed by the pay off. So here is a quick guide on how to make the most of your pigments.

Of course, you could just simply apply the powder to your bare skin for a simple, stripped back look, but the party season demands something a little more dramatic. The strength of your pigment depends on the base they are applied to; below I swatched the pigment alone; with Illamasqua’s Sealing Gel; with Illamasqua’s Vintage Metallix in Courtier; and with MAC’s PaintPot in Painterly.

Beguile

Beguile

Furore

Furore

As you can tell from these pictures, the difference is striking. On my pale skin, both pigments, particularly Beguile, are barely visible when used alone and only add a slight shimmer (which could work well as a subtle highlighter, though Beguile is a little less ‘natural’ due to its iridescent pink and green tones).

MAC’s PaintPot was also pretty useless; I initially thought an eyeshadow base like this one would be perfect for pigments, but the formula is too heavy and thick to allow the powder to be distributed evenly.

courtier

For a daytime look, I was looking for a product that would carry my pigment as well as tone down the glitter. My favourite thing to do this would be Illamasqua’s new Vintage Metallix in Courtier (£16.50). This cream-gel is intended to be used alone (Courtier is a gorgeous “vintage nude” with slight gold shimmer) as a smudge-resistant eyeshadow, however it provides a light but opaque, smooth but slightly tacky base – perfect for a layer of pigment!

For nighttime looks, I needed something that would make my pigments ‘pop’ (cringe… but you know what I mean), so I opted for Illamasqua’s Sealing Gel. This dinky bottle may seem expensive at £7, but it’s uses are endless. It is a mixing medium revered amongst make-up artists for turning eyeshadows into liquid eyeliners. However, if you place a few drops on your eye lid, tap with your finger until it becomes tacky. Once your pigment is applied on top, you’ll see an unbelievable transformation: the colour is bright, the shimmer intense and the coverage even (no lumps of gunky glitter clogging your lid).

This is my version of a day and night look using Pure Pigments (Furore on the left, and Beguile on the right):

How do you make the most of your pigments?

For FOTDs and previews of my blog posts, follow my instagram: http://instagram.com/beautsoup

Hope you like!

Molly x

My Skincare Routine

I have a few confessions to make… I hate the taste of water; the only fluids I’ll willing consume are tea, gin and custard. I never manage my five-a-day (or is it seven-a-day now?) and often have cake for breakfast. And, worst of all, I am a picker; spots, blackheads, random lumps that appear on my forehead, all feel the force of my two forefingers.

All things considered, I should be prone to spots, blemishes and wrinkles. Though I have my genes to thank for my relatively clear skin, I have developed a skincare routine that helps keep break-outs at bay, as well as one for when that monster zit appears on the very tip of my nose.

Make-up Removal:  Simple ‘Kind to Skin’ Cleansing Wipes, £3.49

10814254_10152459363036128_1917527980_n

I have been using these make-up removal wipes for as long as I can remember. My skin is highly sensitive to strong perfumes (even Johnson’s Baby Moisturiser stings 😦 ), but these wipes have never caused any irritation. Simple’s wipes are produced with different formulas, each tailored to different skin types – Cleansing, Exfoliating, Oil Balancing, etc. – I use Cleansing because I prefer full-coverage foundations and concealers that need an equally thorough removal. The only one I would not recommend is the Exfoliating wipes as their course texture can leave your skin feeling a little raw. 

No7 Beautiful Skin Eye Make-up Remover, £8.5010859346_10152459363021128_1544665499_n

The amount of eye make-up I wear means that I have to be careful not to scrub away at my eyes too much when removing mascara and eyeliner. This remover is excellent for lifting off those last bits of glitter, crusted eyeliner (eww) and waterproof mascara. As it is oil based, those with particularly oily skin may not take to this product, however, I would recommend it for anyone with dry or combination skin as it both cleanses and moisturises that delicate skin around the eye.

Cleansing and Toning: No7 Soft and Soothed Gentle Cleanser and Gentle Toner, £8.00 each

Boots No7 is a brand I completely trust when it comes to taking care of my skin. Their products are hypo-allergenic and ph-balanced so as not to cause irritation. As well as having a beautifully silky texture, they also have enough power to sink deeply into the skin, leaving it feeling fresh and hydrated.

10850834_10152459363026128_509900888_n

I know it’s kind of gross but this picture is of the cotton wool pad I use to cleanse my face. This is AFTER using a make-up wipe. Though make up wipes will remove make-up on the surface of the skin, cleansers penetrate deeper into the pores, helping to lift out the residue inside.

Obviously cleansing is crucially important, but why use a toner? Many people skip this process, but toning is essential for restoring the ph balance of your skin. When I was
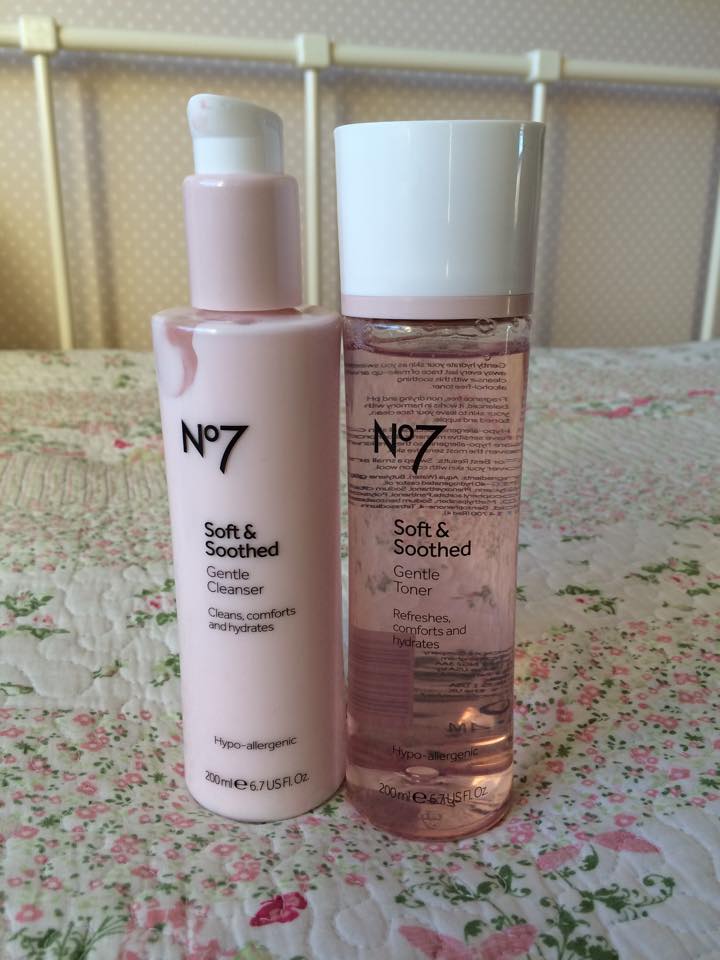
younger my mom told me that while cleansers open your pores, toners close them; I don’t have the dermatological evidence to back this up, but it does enforce the equal importance of cleansing and toning (ideally twice a day). My favourite moisturiser is also No7, I review it here.

Blemishes: No7 Colour Calming Primer, £10.50

In this col10850801_10152459363016128_1593091137_nd weather, my skin can often look red and mottled. To solve this issue I use this colour calming primer, again by No7. The lotion is green – opposite to red on the colour wheel – meaning, once blended, it is particularly effective at reducing redness and helps to even out your complexion (as you can see from the picture below).

10859403_10152459363011128_1963183408_n

When I do have break-outs, I often apply this to the area using a concealer brush, working it around the spot to mute that angry red colour.  The key to this product is blending: a little goes a long way and, without effective blending, can leave your skin with a peculiar green-grey undertone. Once foundation and concealer is applied, however, the green colour is not at all noticeable.

What products are key to your skincare routine?

Hope you like!

Molly x

Review: Urban Decay’s Vice 3 Palette

You could say that I bought this palette by accident, and now I know the meaning of ‘serendipity.’

I was originally looking for Vice 2, released September last year, to add a welcome addition to my palette collection with it’s perfect mix of neutrals and bold pinks and greens. But then I saw this!

In the clam-shell style typical of Vice’s past, this palette comes complete with a full-size mirror and a double-ended synthetic brush (warning: it’s reflective cover holds no mercy when it comes to mucky fingerprints).

The colours are undoubtedly beautiful with four matte transition shades (‘Truth,’ ‘Undone,’ ‘Downfall’ and ‘DTF’) accompanying 16 shimmers. The variation in colours is perfect, with warm tones narrowly out-numbering cooler tones (it is the season for reds, coppers and browns after all!).

My favourite thing about this palette is that, if you take each row separately, it offers a ready-made combination of five colours, each set combining neutrals with an unlikely pop of colour. Champagne meets emerald, taupe meets red.

As always, I have a few complaints. While the shadows have an amazing colour payoff, they are particularly powdery. I’m not sure whether this is more noticeable here because of the number of shimmers (prone to a crumbly texture – think ‘Dust’ from Naked 3) or whether it is an unusual oversight by UD. Regardless, be careful of this excess if you have already applied your foundation and concealer!

I’m also not a huge fan of the brush; the bristles seem too sparse to effectively blend shadows together. Instead, I use it to sweep over my lid when all the blending is done, just to pick up any stray powder that may be lurking there.

Special Mentions:

Unknown

DTF: ‘Taupe Matte with Subtle Floating Tonal Pearl’

This is my favourite of the mattes. It is a perfect transition shade for a smoky eye, subtle or dramatic. I think ‘taupe’ doesn’t really do it justice, it has a purple-grey tone in a natural light that blends beautifully with warm and cool colours alike.

Last Sin:Unknown2 
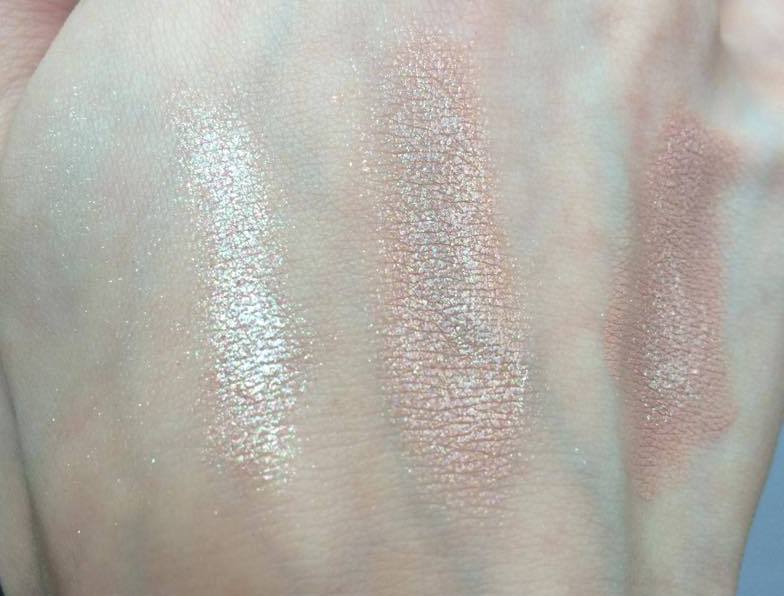
‘Champagne Shimmer with Silver Micro Glitter’

Last Sin was the colour that immediately caught my eye when I lifted the lid; to me, it’s the perfect shade for the festive season and, like DTF, blends well with coppers and browns as well as blues and greens.

Dragon: ‘Bright Metallic Green Shimmer’

I’ve never tried a colour like this before; the thought of green eyeshadow has never really appealed to me, but this colour is gorgeous, whether over the entire lid or just under the lash line. It particularly suits the pink and purple shades in the top row of the palette.

Sonic: ‘Metallic Red-Copper’

I wanted to try out this colour against my skin in anticipation of buying Lime Crime’s ‘Venus’ palette which comprises of these rusty red tones. And I love it! Blended with coppers and golds, Sonic adds something a little bit different to those usual autumn looks.

In this picture I used: DTF (transition); Last Sin (lid); Bobby Dazzler (highlighter); Sonic (lower lash line) and Defy (crease). Lips: Lime Crime Velvetine in Salem (ohmygodthebestlipcolourontheplanet).

Would you consider buying Urban Decay’s Vice 3 palette?

Hope you like!

Molly x

Essential Kit for Perfect Flicks

I discovered eyeliner when I was 14 and proceeded to smudge it all the way around my eye like Avril Lavigne did in her ‘Sk8r Girl’ video. Cringe.

Though a dramatic smoky eye just isn’t smoky enough without a bit of kohl eyeliner, nowadays I prefer the clean, precise lines that only a liquid pen can offer. So I thought I’d scoot through my essential kit for creating the smoothest curves and sharpest flicks.

Revlon ColorStay Liquid Eye Pen, £6.99.

My starting point is always to trace the line I want to follow. No matter how thin and wobbly this initial line may be, it makes it so much easier to thicken later if you have a base to work from.

For this step I always use this liquid eye pen by Revlon. In my experience, these eye ‘pens’ often have a flimsy nib, making it difficult to draw a solid line without awkwardly trying to lay the pen horizontal to the eye, using the side of the nib instead of the tip.

Revlon’s offering is perfectly sturdy, with just the right amount of give as not to feel sharp against the skin. The issue with this pen is that the nib dries out quickly: its coverage is not entirely opaque and can become quite patchy. In a normal beauty review this is obviously a huge no-no, BUT, for the purpose of tracing a line that will later by thickened and defined, this flaw is really a huge bonus. A drier nib means that the flow of product is reduced, making it easier to control where the liner is going without fear of it smudging or bleeding onto the lid (which then ruins the eyeshadow that took so long to blend… we’ve all been there 😥 )

Rimmel ScandalEyes Precision Micro Eye Liner, £5.49.

So now I have traced my line, I begin to thicken it. Whether you want to taper the line as it reaches the outer corner of the eye, or widen it to create a gorgeous flick, this Rimmel eye liner is perfect. Its tip does not come to a point, but a sloped edge. So while it’s outer corner can be used to create ultra-thin wisps, its flatter edge helps draw consistent, thick lines.

Rimmel Glam’Eyes Professional Liquid Liner, £5.29.

Eye pens can sometimes leave a raw, broken edge, particularly when they begin to dry out. To correct this, my last step is to retrace the line with a liquid liner. This Rimmel liquid liner has a super fine brush that glides smoothly over the eyelid to neaten up any unwanted cracks or wobbles and is perfect for creating the sharpest of flicks.

My tip when using liquid liners would be to apply them in long sweeping motions; though the urge is to draw the line bit by bit to be ultra precise, I have found that the most fluid lines are drawn when the liner is applied with as few motions as possible. Having to continually retrace a line in order to smooth out dips and bumps usually results in eyeliner a dozen times thicker than your original line.

With these three steps – trace, thicken and define – you can go wild with shapes and styles like this 60s inspired graphic eyeliner.

So how do you achieve that perfect liner?

Hope you like!

Molly x