 beautsoup is now on Instagram!
Follow for sneak peeks of my latest FOTD’s, OOTD’s and product reviews before I upload tutorials and details here on WordPress: instagram.com/beautsoup Hope you like! Molly x
beautsoup is now on Instagram!
Follow for sneak peeks of my latest FOTD’s, OOTD’s and product reviews before I upload tutorials and details here on WordPress: instagram.com/beautsoup Hope you like! Molly x

 My October favourites are a reflection of the time of year and were mostly geared towards setting up and adding to my autumn wardrobe. That being said, my favourites for this month are all make-up or skin care based (although the backdrop to this photo is a lovely olive green tassel T-shirt I recently bought from Topshop).
Eyes – NYX Jumbo Pencil Eye Shadow Liner in ‘604 Milk’ (£5) and Pastello Eyeliner in ‘Cedrata/Gold’ (£3.99)

NYX’s jumbo eye pencils are a mix of mineral oil and powder, a combination that makes for a gorgeously buttery application. I use this as a base for my eyeshadow, to brighten my water line and as a brow highlighter.
I’ve been looking for a gold eyeliner for a while now, but was not convinced by liquid offerings that tend to carry a ton of glitter. This Pastello pencil caught my eye as it’s a lovely gold colour with an olive undertone so it complements copper, taupe and brown eyeshadows beautifully.
I also purchased Sigma’s Warm Neutral palette this month, see my review here.
Lips – MAC’s ‘Sin’ (£15.50), No7 Moisture Drench Lipstick in ’02 Plum Beautiful’ (£9.95) and Revlon Super Lustrous Lipstick in ‘Mink’ (£7.49)
MAC’s Sin is a colour I’ve been looking for for a while now; I wanted a deep red/plum with a matte finish that would be striking enough for an autumn evening – and here it is!
MAC lipsticks are most definitely my kryptonite, I’m yet to find a brand that matches their thick, tacky texture that stays put for almost 6 hours!
The other choices have been reviewed here and here. No7’s Plum Beautiful preempts SS15’s trend for plums on the eyes and lips, while Revlon is the star of my new fascination with brown lipsticks.
Nails – Rimmel Salon Pro Nail Polish in ‘397 Beige Babe’ (£4.49)

Prize for the worst name ever: cringy and inaccurate.
This colour is a re-make of a ‘Lycra Pro’ colour which was a little lighter, beige colour. However, the ‘Salon Pro’ version is a mid-taupe, a lovely accompaniment to the typical autumn shades: berry, burnt orange and aubergine.
Rimmel claims that these polishes are chip resistant for 10 days, which is impossible to achieve without keeping your hands away from water and sharp corners for that amount of time. If you’re willing to keep topping it up, though, I’d definitely recommend it.
Body – The Body Shop Almond Body Butter (£13.00 £6.50)
THIS IS THE BEST BODY BUTTER IN THE HISTORY OF THE WORLD. I am a sucker for things that smell like ice-cream and this butter’s sweet creamy scent is just the thing that you want to slather all over yourself. I have dry skin not only on my face, but all over my body, and this is the only butter that my skin soaks up like a sponge. It absorbs in minutes, but the smell remains for hours. The only issue is that it’s discontinued (I have no idea why 😦 ), so while it’s nice and cheap now, it won’t last for long.
I should start a petition or something…
Fragrance – ‘Womanity’ Eau de Parfum by Thierry Mugler (£49.50 for 50ml)
Staying with the theme of smells, this is my favourite perfume ever. Like Mugler’s other perfumes ‘Alien’ and ‘Angel,’ ‘Womanity’ has a really unique, sweet-savoury, smell – top notes of sweet green fig, a heart of caviar and base notes of elegant fig wood – that lasts all day. It’s strength means I can still smell it on my clothes when I open my wardrobe ❤
Though it’s at the top end of the price-list, Mugler has developed these beautiful eco-friendly refillable bottles, which means you can top up your supply for only a fraction of the initial price (a refillable 50ml bottle is only £38.50).
What are your favourites this month?
Hope you like!
Molly x

I’ve recently started work at a local university (hence why my posts will now have to wait till weekends) and so, while I need to look smart and professional, a little self expression is always welcome.
Outfit
 In terms of outfits, I like to stick to neutral colours – white, black, grey and navy – but play around with textures and patterns. Mohair, lace, cord and viscose help to add a bit of interest to block colours and each have their own particular way of clinging to my figure or flowing loosely. I have a definite thing for all things check and tartan and recently bought a two piece check co-ord set from Marks and Spencer. The top piece is a gorgeous peplum shape, the fit of which nicely balances out the straight legged trousers.
Make-Up

My work make-up follows the same principle as my outfit: I tend to keep my eyes neutral, but use a bold colour on my lips. Benefit’s ‘Big Beautiful Eyes’ palette is the perfect little contouring kit containing a creamy ‘industrial-strength’ concealer and three different colours to help create a gorgeous muted smokey eye.
 The palette offers a concealer in ‘Boing 02,’ an alabaster pink base eyeshadow, a cocoa shimmer contour shadow and a deep chocolate liner colour, each of which have their own designated brush specially designed for their specific forms of application.
Benefit’s ‘Boing’ is a shade darker than my usual concealer so I tend to use it to cover blemishes and opt for MAC’s Studio Finish Concealer in NC15 under my eyes. My base is completed with a sweep of Bare Mineral’s Touch Up Veil in ‘Light’ – a lovely lightweight compressed powder that helps to minimise shine and even out my complexion.
Finally, my current lipstick of choice is No7’s Moisture Drench Lipstick in ’02 Plum Beautiful,’ which not only has a lovely satin finish but also doubles up as a lip moisturiser.
Make-Up Bag

It’s rare that make-up applied at 6am will stay put until 5pm, so I carry a mini make-up bag with me to help top up throughout the day. Inside I carry my lipstick of choice, a dinky reel of dental floss, a mini tube of hand cream and a travel bottle of perfume. I also take my Collection 2000 Lasting Perfection Concealer in ‘Fair 1:’ this concealer is considerably lighter than that in the Benefit kit so I top it up at lunch time to freshen up my face and stop my eyes looking heavy and tired.
What make-up essentials do you take to work?
Hope you like!
Molly x

So I got the job! And thought it was only right that I celebrate with a make-up investment. As I’ll be keeping my face relatively neutral for work, why not use Urban Decay’s Electric palette to liven up weekends?

(L-R) Revolt; Gonzo; Slowburn; Savage; Fringe; Chaos; Jilted; Urban; Freak; Thrash
The palette sees the return of ‘Revolt’ – ‘bright metallic silver shimmer with silver glitter’ – and ‘Chaos’ – ‘a bright blue matte with floating tonal pearl’ – along with 8 new show-stopping colours.

Each colour demands attention in its own right, but can also be mixed to create kooky combinations with great results.
Here, I used Fringe in my crease, Freak on my lid and Urban underneath my lower lash-line.
Some reviews that I’ve read have commented on how the brush impedes application, however, I think its thicker-than-average synthetic fibres help to apply the colour evenly. Whereas some brushes tend to hold on to the colour, this double-ended brush is comparatively clean after applying shadow to the eye. The firm bristles also allow for precision application which helps create bold definite lines. Obviously, though, this means that a softer brush may be needed to help blend colours when necessary.

Though all of the colours are undoubtedly amazing in the palette, I’ve found that the pigmentation varies and is, surprisingly, weaker in what first appear as the boldest colours.
Here, I used Gonzo on my lid, but found that three layers of shadow was necessary to achieve a decent colour. Even then the colour is not quite the same as how it appears in the palette: it seems more of a cornflower blue than a ‘bright turquoise.’ By comparison, Slowburn – used under my lower lash-line – has a brilliant colour payoff, so much so that it stains my skin slightly when I remove my make-up!

The palette offers a great range of colours that allows for lots of different looks; however, I think that a matte black or white would have made the palette perfectly rounded. In this final look, I began with a black base (GOSH Mono Eyeshadow in ‘Black 006’) and added Thrash to my inner corner, Chaos underneath my lower lash-line and Revolt on the inner portion of my lid to create a dramatic nighttime look.
Overall, I’d give this palette 8/10. The colours are gorgeous and are, in the main, easy to apply, but their versatility does depend on more neutral colours that can only be supplied by another palette.
What do you think of Urban Decay’s ‘Electric’?
Hope you like!
Molly x

Cue angel song… Aaaaaah.
 Sigma’s Warm Neutrals Palette presents 12 gorgeous shadows, each with richly pigmented pink, beige and burgundy tones – perfect for Autumn.
I’ve been coveting this for so long. Having already fallen for the versatility of UD’s Naked 3, I thought that this palette – which offers some stronger, exaggerated colours – would allow me to ramp up my neutral go-to looks with a new pop of colour.

(L-R) Oyster Sand; Sugar Milk; Mild Mannered; Dove; Fawn; Cinnamon; Russet; Balanced; Cosy; Innocent; Optimistic; Warm Stone.
The palette (priced at £29.95) offers the perfect mix of matte, satin and frosty shades. The matte shades, like Cinnamon and Cosy, apply like butter and make the ideal transition colours to add some definition to your crease (as below). The satin shades, particularly Oyster Sand and Balanced, have a more powdery texture and so require some patience to get that desired colour payoff. 
My only complaints would firstly be the smell. Compared to the dizzy heights of MAC’s signature vanilla scent, Sigma’s shadows have a peculiar chemically smell (if I’m absolutely honest, it’s a little like cheap scented tissues), so it’s probably a good thing they are applied a fair distance from your nose.
Secondly, the pigments in the darker colours, like Russet and Warm Stone, while they’re great for creating dramatic looks, can collect in your brushes. Be careful to remove any access (I usually just swipe the brush along my hand) before jumping into the lighter colours or a different palette.
Special Mentions

Oyster Sand: ‘Soft, Light Pink with Periwinkle Undertones.’
This colour is so unique. As the description says, it has a blue/purple shift which picks up the light beautifully. It’s great for lightening the inner corner of your eye, but the ‘periwinkle’ shimmer isn’t neutral enough to work as a highlighter. I’ve also found it hard to make it work with the neutral colours in the palette, but it is amazing with the pinks and burgundies.

Optimistic: ‘Sophisticated Watermelon.’
Prize for the best description ever. To me, this is one step better than UD’s Naked 3’s ‘Dust.’ It’s colour is more exaggerated than ‘Dust,’ with a lovely unusual red base. I’ve always been wary with red eyeshadows as they can make my pale skin look bruised and tired. However, ‘Optimistic’ is the perfect balance of pink and red to add the right level of warmth to any look.

Russet: ‘Deep Burgundy.’
This is another great departure from the usual neutral palette; instead of the conventional greys, taupes and black, ‘Russet’ is the colour for creating an autumn inspired smokey eye.
Date Night FOTD

For this look, I combined my three favourites into a smokey eye, topped off with my must-have flick. I echoed ‘Russet’s’ burgundy colour with MAC’s ‘Sin’ lipstick and Rimmel’s Lasting Finish Nail Polish in ‘Black Cherries 193.’ And voilà!
Would you consider Sigma’s Warm Neutrals Palette?
Hope you like!
Molly x
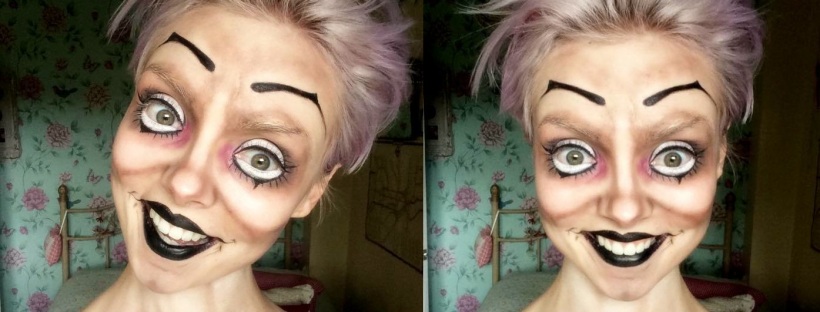
 This look is a mixture of many I’ve found on the internet under ‘doll,’ ‘ventriloquist dummy’ and ‘mime’ make-up tutorials. While I think it’s really creepy by itself, it can easily be added to to suit your costume: you could add fake blood, stitches, coloured contacts and lipstick to make this look your own.
Step 1 to 3
1. My relationship with face paint is pretty strained; cheaper, supermarket face paint tends to dry very quickly which can make application difficult. For this look I didn’t want a bright white face just a paler complexion so I mixed the paint with my normal foundation.
My eyebrows are pretty dark so I covered them using a glue stick (rub over the brow to flatten the hairs and allow to dry completely), top with a thick concealer and a dusting of powder.
2. Heavily contour the cheeks, nose, chin, forehead and underneath the eyes using a taupe coloured eyeshadow.
3. Blend fuchsia, red and grey-blue eyeshadow into the inner corner of the eye and bring it down underneath the eye (it helps if you trace where your early morning puffiness would usually be!).
Step 4 to 6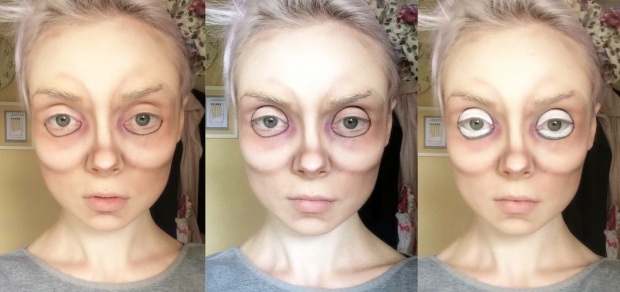
4. Trace a crescent underneath the eye with a liquid black eyeliner.
5. Do the same on the eye lid following the shape of your eyeball to help achieve a circle shape.
6. Colour in the circle using a white eyeliner pencil (NYX Jumbo Eye Pencil in ‘Milk 604’ has a great colour payoff and is really easy to blend). Remember to colour your water line!
Step 7 to 9
7. Using the same taupe eyeshadow draw an upside-down triangle from the base of the cheek towards the jawline. Darken the area around the eye with the same colour. Trace eyebrows using a eyeliner pencil (it saves the mess if you make a mistake).
8. Fill in the brows using a liquid eyeliner – be sure to arch them steeply. Contour around the brows.
9. Cover the lips in your chosen lipstick. Use a liquid eyeliner to bring a line out from the edges of the lips towards the cheek to create a creepy smirk. You could also smudge the under eye circles as I have done here.
Step 10 to 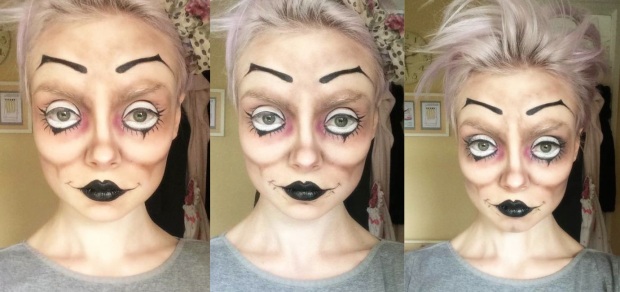 12
12
10. Draw along the upper lash line with an eyeliner and add wispy eyelashes to the crescent you drew underneath your eyes earlier.
11. Smiling with your mouth closed, trace the wrinkles and lines that appear around your lips with an eyeliner.
12. With your contouring eyeshadow, add vertical lines from your natural eyebrows up towards your new eyebrows and blend slightly to create frown lines. Add false eyelashes. Poof your hair. And ta da!!!
Hope you like!
Molly x


For me, the colder months of the year don’t just bring fireworks and Christmas presents, but also cracked lips and a peeling nose (eww). My skin has always been woefully dry, so the trend for a fresh-faced, dewy look was one I’ve been keen to get right.
It’s taken a bit of time, but I think I’ve finally cracked it! Here are my five steps for that sought-after glow:
1. Moisturiser – No7 Beautiful Skin Day Cream for Dry/Very Dry Skin SPF 15, £12.50.

I’ve tried all sorts of moisturisers but this is by far my favourite. Unlike others I’ve tried, it doesn’t sit on top of my skin, but gets absorbed almost immediately. It also doesn’t over compensate by making my face feel heavy and oily.
(I’m yet to be convinced that I need a night cream too, I just use this every morning and every night).
2. Radiance Fluid – No7 Skin Illuminator: Radiance Boosting Beauty Fluid, £11.00.
 This is my ultimate secret weapon. This fluid has a pearlescent finish that has no other purpose (that I know of…), but to make your face glow. It’s like 12 hour’s sleep and a long soak in the bath in a bottle! It can be used alone, under or over foundation: a light sweep is great for adding a subtle shimmer, while a thicker coat is perfect for highlighting.
My only complaint is the method of application; you have to squeeze the cream through a clumsy brush extension which can make it difficult to control how much is dispensed at any one time. Definitely worth a try!
3. Foundation and Sponge – Rimmel London Match Perfection Foundation, £6.99 and Real Techniques Miracle Complexion Sponge, £5. 99.

Two months ago, I would have sworn by MAC’s Studio Fix Fluid as the perfect foundation. It offers brilliant, full coverage with a gorgeous matte finish (and smells like old school paint!).
For a dewy-look, however, this Rimmel foundation offers a great alternative – it makes my skin look and feel perfectly hydrated.
I’m also a recent convert to the beauty blender; I bought this cheaper alternative to test it out (I’ve always used my fingers to apply my base) and will never look back!
When damp, the sponge is perfect for tapping and blending foundation into the face, leaving a flawless, dewy look.
4. Highlighter – No7 Instant Radiance Highlighter, £9.95.

This is a very new addition to my make-up collection, but so far I am really impressed.
It comes in a variety of colours, but I chose a gorgeous champagne shade, which offers a healthy warm shimmer without any glitter or exaggerated sparkle.
It’s rollerball applicator is extremely easy to use and combines the benefits of a powder and a liquid highlighter: it can be blended easily like a liquid, but is light and build-able like a powder.
5. Gloss – Vaseline Lip Therapy Petroleum Jelly, £2.18.

Good old Vaseline! With the recent trend for bare-faced beauty, vaseline offers the perfect light sheen to the lips to complete the dewy look.
It can also be used on bare eyelids or on top of eyeshadows to create a unique glossy finish (like that used by MAC at London and New York’s AW14 Fashion Week).
A thin coat of Vaseline on your eyelashes before bed is also meant to nourish longer, thicker, stronger lashes (something I am in definite need of).
What are your go-to products for radiant skin?
Hope you like!
Molly x

I would like to say a huge huggge thank you to PolkadotSparkles for nominating me for the Liebster Award!

The award is for new bloggers with under 1000 followers and offers a virtual pat-on-the-back, recommending the nominated blogs as those that are worth watching!
As part of the award, each nominated blog should follow these rules:
1. You have to link back to the person who nominated you.
2. Nominate blogs with under 1000 followers that you would like to commend.
3. Answer a list of 11 questions set by the person who nominated you.
4. Set a list of 11 questions for your nominated bloggers to answer.
5. Tell them that they have been nominated by commenting on their blog.
Questions
1. Do you have a middle name? If so, do tell…
I do indeedy, it’s Louise.
2. Who inspired you to blog?
I’ve always looked to blogs for make-up and fashion inspiration so I thought I’d have a go myself! It also gives me something creative to do besides my day-to-day potterings.

3. Do you have any pets? If so, what are they, including names…
I have a Lionhead rabbit called Stella, who has just turned two (here’s a picture!).
4. If you could travel anywhere for six months, where would it be?
I would travel through Italy, taking extra long breaks in Florence, Venice and Rome.
5. What is your favourite beverage (alcoholic/nonalcoholic)?
Gin and Tonic! Or, a cocktail served at The Duke of Cambridge in Oxford called a ‘Lemon Meringue.’ From what I can remember (it helped fuel many nights of drunken dancing), it mixes limoncello, frangelico, lemon juice, sugar and an egg white. Mmmm.
6. What is the most ridiculous thing you have ever done?
I sort of agreed to let someone dye my hair a strange shade of orange… I looked pretty ridiculous afterwards.
7. What would you say is the best thing about yourself?
My chocolate brownie recipe.
8. Name your favourite TV series.
Masterchef Australia.
9. What was the last film you went to see at the movies?
Gone Girl – amazingly weird!
10. What is your favourite restaurant called?
Ooo, this is tricky. It depends on what mood I’m in. I’m partial to a Nando’s! At the moment, though, my favourite is a pub near my house that serves the most delicious scallops and calamari.
11. What is your all-time favourite childhood cartoon?
I remember always watching Hey Arnold as soon as I got home from school. And Recess. And Cow and Chicken.
Nominees
I’d like to nominate the following blogs for the award as I’ve really enjoyed reading their posts:
– ElleKae
Here are your questions:
1. What/Who inspired you to blog?
2. Beauty product you can’t live without.
3. New handbag or new shoes?
4. Name three things you’re currently coveting.
5. What era made the best fashion statements?
6. Best book you’ve read recently.
7. What’s the first three things on your bucket list?
8. Tea or Coffee?
9. Describe your worst make-up/fashion faux pas.
10. If you could visit anywhere in the world, where would it be?
11. What lipstick are you wearing right this minute?
Spread the love!
Molly x

I recently came across an article on Harper’s Bazaar’s website that claimed that mod hair is making a comeback (here it is incase you fancy a read). With a hair-cut like mine, there’s hardly room for “envious volume” and a “Bardot-inspired bouffant” so, not wanting the mod revival to pass me by, I thought I’d channel my 60s alter ego with a casual cut-crease and a polo shirt dress.

The Wearable Cut-Crease
Tutorials for the cut-crease abound on Youtube and with good reason: it’s a striking look that allows you to use those eyeshadows that always seem to get neglected in the palette. Because your lid is left pale or relatively light and the colour kept to the periphery, the style can withstand the darkest and brightest of colours without looking carnivalesque.
That being said, for a day-to-day look I opted for light and neutral shades. Below is my tutorial:
Step 1: Apply primer all over your eye, right up to your eyebrow, and sketch out a horizontal tear-drop shape across your lid as I have done here with a kohl eyeliner (I use Rimmel Soft Kohl Pencil in ‘Sable Brown 11’).

Step 2: Blend the eyeliner up towards your eyebrow using a similar coloured eyeshadow (I used UD’s Naked 2, ‘Taupe,’ with ‘Busted’ towards my outer v to add a bit of depth). Before I do this, I like to place Sellotape underneath my eye to help me achieve a sharp, straight line.
Step 3: Using a flat eyeliner brush and a thick concealer (I use MAC Studio Finish SPF 35 in NC15) retrace the tear-drop shape to neaten up any unwanted smudging. Apply highlighter just below your eyebrow, making sure to blend this into the eyeshadow you have just applied (I use Rimmel Glam Eyes Mono Eye Shadow in ‘Glam Ice’).

Step 4: Add a light colour of your choice to your lid (I use UD’s Naked 3 ‘Dust’). Using a liquid eyeliner, draw a line from the inner corner of your eye to the outer corner and another that curves up to the tip of the tear-drop shape, like I have done in the first picture.
Step 5: This step really tests your patience, but it is hugely important for the end result: gradually build up your eyeliner to create a thick sweeping line.
Step 6: For a daytime look, I like to keep eyeliner to my upper lash line and only apply the taupe eyeshadow underneath my eye.
Step 7: Finish with mascara, and/or lashes, and voilà!
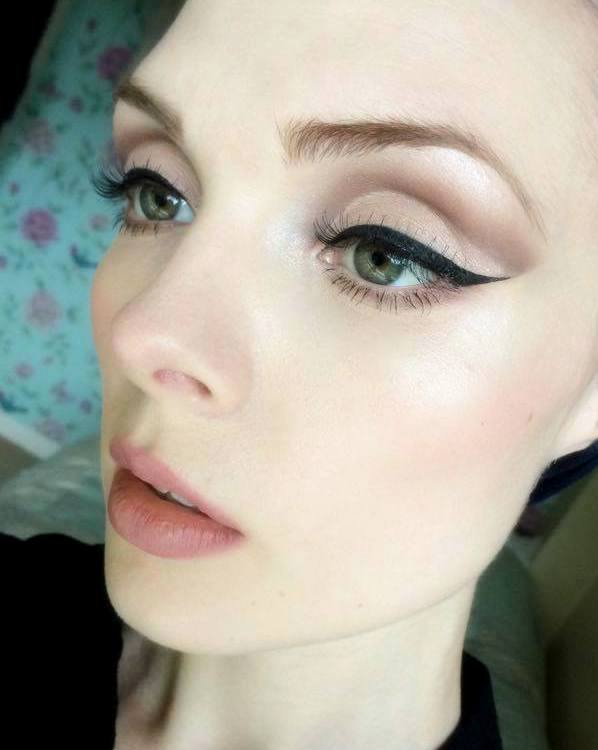
Looking at photographs of Edie Sedgwick or Mia Farrow, the rest of the face should be kept light, fresh and youthful; I skipped the bronzer and opted for a little blusher at the top of my cheeks (I use No7 Natural Blush in ‘Soft Damson 10’) and used my Glam Eyes white eyeshadow as a highlighter just below my eyes and round towards my ears. I wanted to keep my lips equally pale so I used a very sparing coat of MAC’s ‘Snob,’ a light neutral pink.
Of course, there’s plenty of scope to make a cut-crease more dramatic: you can change i t’s shape, it’s colouring and it’s definition, as I have done in this picture. Instead of the tear-drop shape, I’ve flicked out the corner of the arc to mimic my eyeliner; added UD’s Naked 2 ‘Blackout’ to my crease; and brought the eyeliner underneath my eye into a point at the inner corner to create a cat-eye effect.
The Outfit

Dress, Cooperative at Urban Outfitters;
Shoes, Dr Martens (Polley); Jacket, Barbour.
For this look, with quite intricate make-up, I wanted to wear something that was a little boyish, but at the same time feminine (a style typical of Twiggy with her pixie cut and boxy, short dresses). My polo shirt dress is perfect; though it’s colour and shape first appears simple, the material falls perfectly to create a feminine silouhette. My oversized Barbour jacket and Dr Martens, both iconic in men’s mod fashion, add a clunky, kooky feel to counter my dress, bringing the look into the twenty first century.
What elements of mod fashion will you be adopting this autumn?
Hope you like!
Molly x

 Think Jennifer Aniston in the first season of “Friends,” or a young Drew Barrymore. After a short revival last summer, brown lipstick has again disappeared… far far away. It seems to be bundled with other cringeworthy 90’s trends – scrunchies, JNCO jeans and mood rings. But if chokers and jelly sandals can make a proper comeback, there’s surely room for coffee, chocolate and chestnut coloured lips.
I was first interested in trying a brown lipstick after swatching MAC’s ‘Velvet Teddy.’ Thanks to Kylie Jenner, the shade has become extremely popular and I was intrigued to try what’s described as a “deep-toned beige” on my skin. I was really disappointed 😦. It has a warm pink undertone that is very close to my natural lip colour; and if I’m paying £15.50, I want people to notice what I’m wearing!
So before investing in a more expensive brown lipstick, like MAC’s ‘Paramount’ or Bobbi Brown’s ‘Über Beige’ or ‘Über Suede’ (£19.50), I thought I’d test out some cheaper drugstore versions.
The ‘Gateway’ Brown – NYX Soft Matte Lip Cream in ‘Stockholm,’ £7.99.

Okay… this isn’t brown. But if you’re not convinced about going all out with a cocoa or latte colour, then why not try a lipstick with a cooler base instead of a pink undertone? This NYX lip cream, which I bought from an eBay stockist, would be a gorgeous nude colour for those with olive skin and, on pale skin, it’s an unusual peachy coral shade. (An added plus: it smells like cake batter!)
As much as I love its matte effect, I think it looks a little flat by itself so here I used Rimmel Lasting Finish 1000 Kisses Lipliner in ‘Spice,’ blending the colour into the centre of my lips to create an ombre effect.
The Everyday Brown – Revlon Super Lustrous Lipstick in ‘Mink, 671′ in £7.49.

Aah, I love this colour! It has a rich taupe pigment which means the colour pay off is great and makes a definite statement; it’s caramel shade is unlike anything I’ve tried before.
I do think that brown lipstick is more versatile than people give it credit for. With minimal eye make-up, it can add a kooky edge to your face with almost no effort needed. With bold dark eyes, it perfectly compliments almost any colour eyeshadow, but particularly suits metallic shades – copper, bronze and gold – that are so on trend at the moment.
Lipliner: Rimmel Lasting Finish 1000 Kisses Lipliner in ‘Cocoa Mandoria,’ £2.99.
The Smokey Brown – Rimmel Lasting Finish Lipstick in ‘Coffee Shimmer, 264,’ £4.99, and Rimmel Scandaleyes Shadow Stick in ‘Trespassing Taupe,’ £4.49.

For this look I began with Rimmel’s ‘Coffee Shimmer,’ a super glossy russet coloured lipstick. The colour is nice, if a little nondescript, so I wanted to add a little bit more interest. As strange as it seems, my Scandaleyes shadow stick was a worthy stand-by. It has the same smooth texture and glossy finish that I would want from a lipstick and helped to cool down the warm reddish tones of ‘Coffee Shimmer.’
Lipliner: Rimmel Lasting Finish 1000 Kisses Lipliner in ‘Capuccino,’ £2.99.
I don’t know quite how to describe it, but brown lipstick has a way of bringing your whole face ‘together.’ Where a pink-nude lip is subtle, almost meant to be ignored, and a red lip demands it’s own attention, a brown shade is somewhere between the two, perfectly complimenting and completing your look.
So have I convinced you to try it out?
Hope you like!
Molly x
